

Confused about buhurt armor sizes, weapon choices, or how to keep your gear gleaming? Fear not, warriors! Our FAQs are your shield against confusion, answering all your burning questions about:
Armor Kit
Yes. If you order our padded kit, we can adjust your bare-body measurements and make both the under-armor padding and the steel parts together.
We use our own measurement charts and know exactly how much allowance to add for the padding thickness.
For other brands’ padded kits, we can’t guarantee the fit — every manufacturer uses different thicknesses and patterns, so we can’t calculate the correct allowances.
To ensure the helmet for armored combat fits correctly, take your measurements without any padding, using a tailor’s measuring tape.
Refer to the diagram:
- A – Maximum head circumference measured horizontally around the widest part of the head (typically from the forehead across the back of the skull).
- B – Vertical distance from the center of the eye level straight down to the top of the shoulder. This helps us determine the appropriate helmet length to ensure full coverage without restriction.
For the best fit, please double-check your measurements and include them in centimeters.
If there are any specific considerations — such as plans to wear additional padding, a request for reinforced vision protection (e.g., extra eye bars), or anything else that might influence the build — please mention this in the order comments during checkout. We take these details into account during production to ensure your helmet arrives ready and optimized for use.

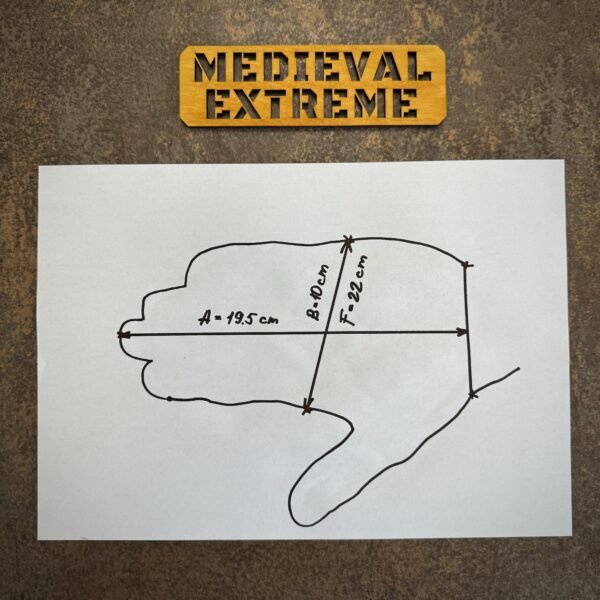
A, B and F – are measurements for the gauntlets required to make them or find out the right size.
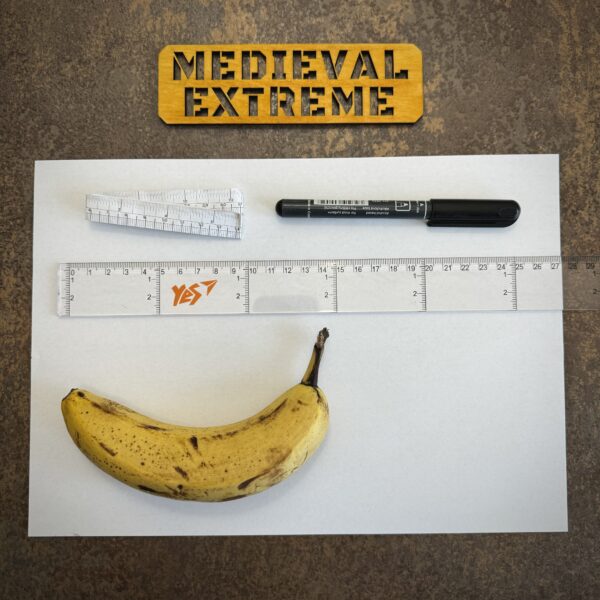
Gather your tools:
- Paper
- Pen
- Flexible measuring tape
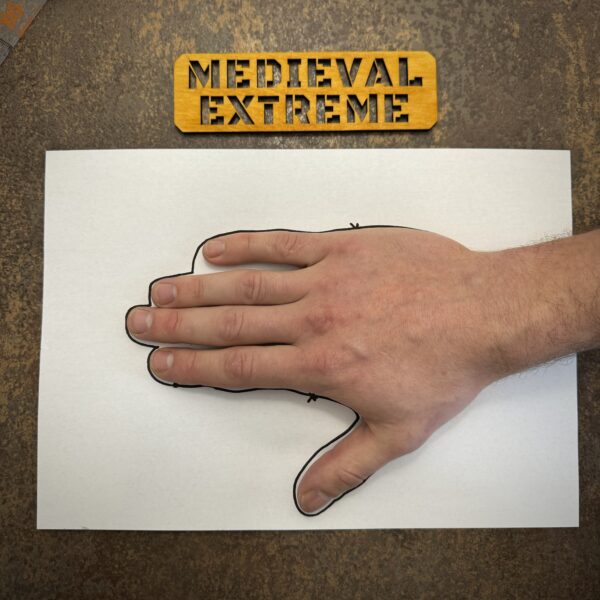
Step 1: Trace your handprint:
Lay your hand flat, fingers relaxed. Carefully outline your entire hand, including fingertips and wrist.
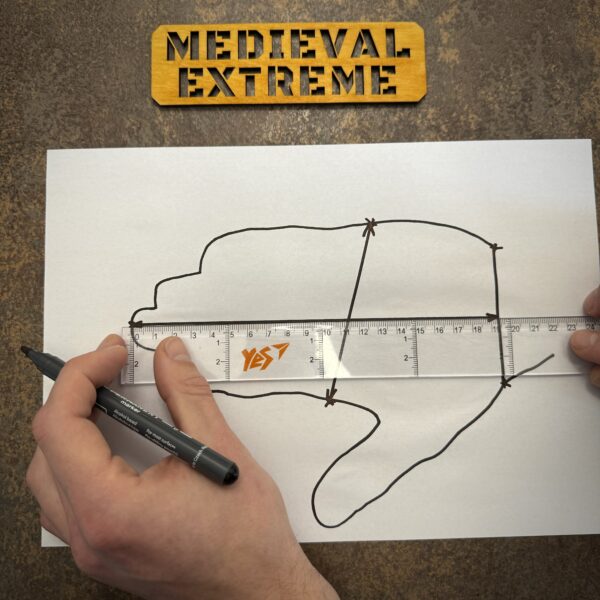
Step 2: Palm length:
Grab the measuring tape and measure the straight line from your middle finger’s tip to your palm’s base at the wrist. This is your palm length (A).
Step 3: Knuckle width:
Using the outline you drew on the paper in step 1, measure the straight-line distance across the knuckles (B).
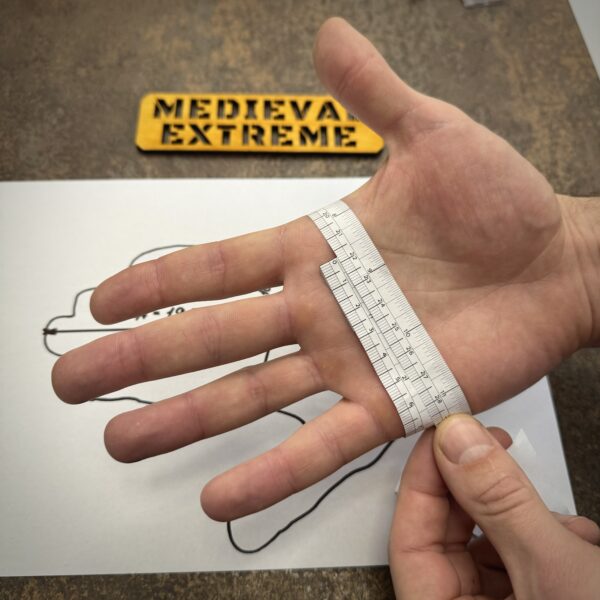
Step 4: Palm circumference:
Keep your fingers relaxed and together. Wrap the tape snugly around your knuckles This is your palm circumference (F).
Pro tips for perfect sizing:
- Dominant hand: If one hand is larger, mark it for specific size checks.
- Size up: When between sizes, opt for slightly larger measurements for the gauntlets
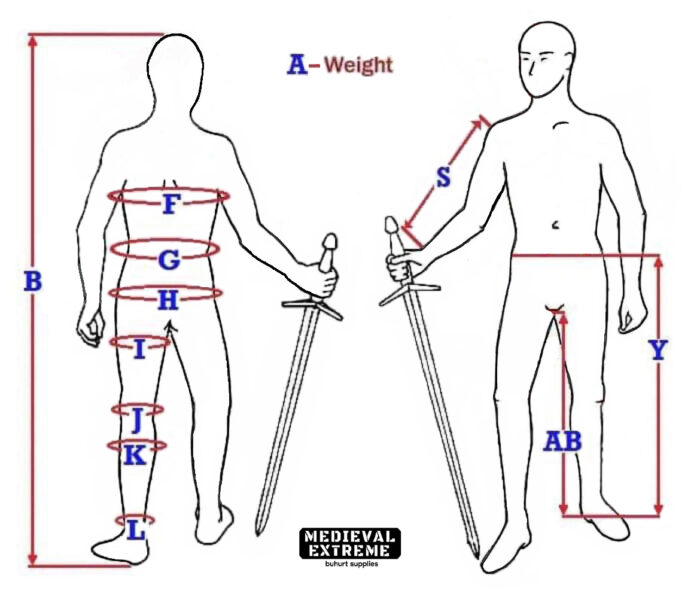
We understand the importance of a well-fitting padded set for both comfort and protection in buhurt. Here is the guide on how to take your measurements for your gambezone and padded chausses (or pants).
Here’s a guide for the measurements for the under-armor padded set:
Body:
- B (Height): Stand tall and measure your height in centimeters (cm) without shoes.
- F (Chest Circumference): Wrap the tape around your chest at its fullest point, keeping it parallel to the ground. Breathe normally, don’t inflate your chest!
- G (Waist Circumference): Find your natural waist and measure its circumference. Avoid tightening excessively.
- H (Hips Circumference): Measure around your hips at their widest point, level with your buttocks.
- Weight: Weigh yourself in kilograms (kg) for accurate size charts.
Arms:
- S (Sleeve Length): With your arm relaxed, measure from your shoulder joint to your wrist bone, slightly bending your elbow.
Legs:
- Y (Leg Length): Stand straight and measure from your belt line down to the floor.
- AB (Groin to Floor): For extra protection, measure from your groin area down to the floor while squatting slightly.
- I (Thigh Circumference): Find the widest part of your thigh and measure its circumference.
- J (Thigh Above Knee): Measure around your thigh just above the knee.
- K (Calf Circumference): Wrap the tape around the widest part of your calf.
- L (Ankle Circumference): Measure your ankle circumference, ensuring a snug but comfortable fit.
Preferred Length:
- Gambezone Length: Decide your desired length and measure from the base of your neck down your front to that point.
Additional Tips:
- If unsure about any measurement, err on the slightly bigger side for adjustments later.
- Use a flexible measuring tape and stand on a level surface.
- Double-check your measurements for accuracy.
Remember: Proper measurements for the under-armor padded set ensure a perfect fit, maximizing your comfort and protection in the heat of battle. Conquer the measuring tape and dominate the battlefield!
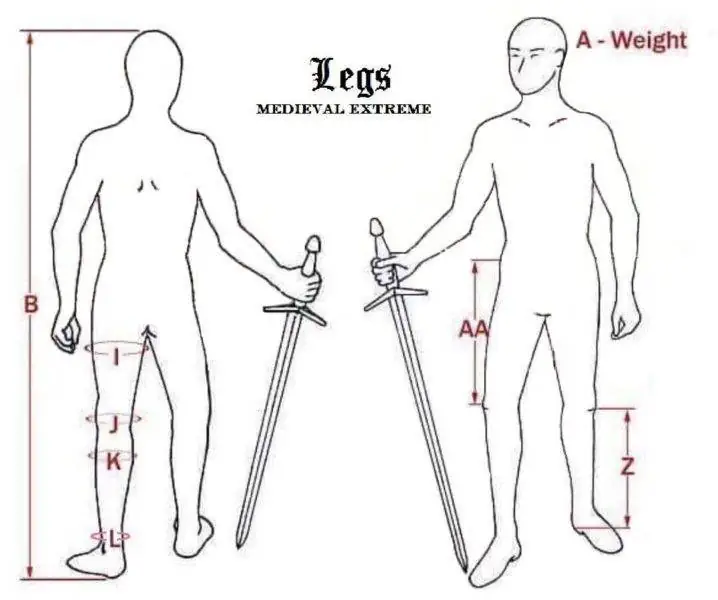
General Recommendations for Measurements for Legs Armor:
Clothing: Measurements should be taken wearing the padded chausses you intend to wear with the armor. Sweatpants or jeans will not accurately reflect the thickness of the padded chausses and could lead to ill-fitting armor.
Bare Legs If you are ordering both legs and padding together, measuring your bare legs is acceptable. However, please clearly indicate on the measurement sheet that the measurements are for bare legs.
Measurements: Take all measurements with a flexible measuring tape, snug but not tight.
Additional Notes:
- Take all measurements with padded chausses or similar under-the-legs armor and shoes on.
- Ensure you or the person being measured is standing straight and relaxed with feet shoulder-width apart.
- Use a flexible measuring tape for accurate circumference measurements.
- Consider additional measurements if specific armor requires them (e.g., knee joint width, foot length).
- This table provides a basic guide and adjustments might be necessary based on individual body shape and specific armor design.
Required measurements:
A. Weight: Measure your weight in kilograms or pounds without wearing any armor.
B. Height: Stand tall and measure the distance from the top of your head to the soles of your feet.
I. Maximal thigh circumference: Find the widest part of your thigh, usually just above mid-thigh. Wrap the tape measure snugly but not tight.
J. Thigh circumference above knee: Measure the circumference about 10 cm above your kneecap with the tape snug but not tight.
K. Calves: Measure the widest point around your calf muscle with the tape snug but not tight.
L. Ankle: Measure the narrowest part of your ankle just above the ankle bone with the tape snug but not tight.
AA. Hip to Knee: Stand with your leg relaxed. Locate the bony bump on the side of your hip bone (greater trochanter) and the center of your kneecap. Measure the distance between these points while keeping your leg straight.
Z. Knee to Ankle: Stand with your leg relaxed. Locate the center of your kneecap and the highest point of your ankle bone. Measure the distance between these points while keeping your leg straight.
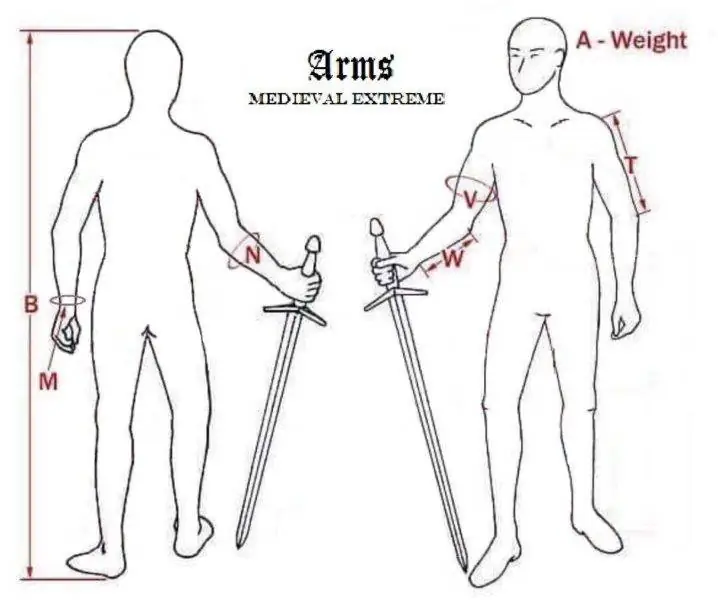
General Recommendations for Measurements for Arms Armor:
Clothing: Measurements should be taken wearing the gambeson you intend to wear with the armor. Sweaters or jackets will not accurately reflect the thickness of the gambeson and could lead to ill-fitting armor.
Bare Arms: If you are ordering both arms and padding together, measuring your bare arms is acceptable. However, please clearly indicate on the measurement sheet that the measurements are for bare arms.
Measurements: Take all measurements with a flexible measuring tape, snug but not tight.
Additional Notes:
- If your gambeson has any unusual features that might affect the fit of the armor, please describe them in the notes section.
- For best results, have someone else take your measurements.
- Feel free to include any other measurements you think might be helpful, such as elbow circumference.
Required measurements:
A. Weight: Measure your weight in kilograms or pounds.
B. Height: Measure your full height from head to toe.
M. Wrist Circumference: Measure above the gambeson, not on top of any leather straps.
N. Forearm Circumference: Measure the fullest part of the forearm.
V. Bicep Circumference: Measure the fullest part of the bicep, slightly flexed.
W. Forearm Length: Measure from the wrist joint to the tip of the elbow.
T. Shoulder Length: Measure from the point where the shoulder meets the neck to the tip of the elbow.
Before we begin, ensure you have your actual padded under-armor kit ready: gambeson, chausses, and c-belt. Using anything else like modern jackets, sweatpants, or layered sweaters won’t provide the accurate measurements needed for fitting your brigantine. If you’re planning to order both your padded kit and brigantine from our shop simultaneously, sending your bare body measurements is acceptable. However, please inform us of this so we can properly adjust the sizing based on your true dimensions.
Additional Tips:
- When taking measurements, stand relaxed with good posture.
- Make sure the measuring tape is snug but not tight.
- If you’re unsure about any measurements, it’s always best to err on the side of being slightly larger.
- Consider having someone else take your measurements for greater accuracy.
This table should give you a good starting point for taking all the necessary measurements for your medieval body armor. Remember, precise measurements are crucial for a comfortable and well-fitting suit of armor.
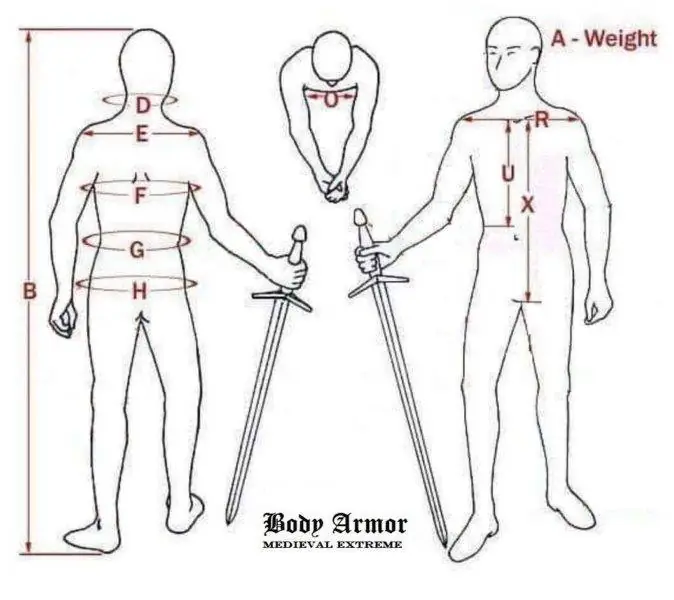
Required measurements:
A. Body Weight: Stand on a scale without shoes or other heavy clothing.
B. Full Body Height: Stand straight, barefoot, with your back against a wall. Have someone measure from the top of your head to the floor.
D. Neck Circumference: Measure around the base of the neck, just above the collarbone.
E. Shoulder Width (Back): Measure from the seam of one shoulder pad to the seam of the other, across the back.
R. Shoulder Width (Front): Measure from the seam of one shoulder pad to the seam of the other, across the chest.
O. Chest Width (Arms Together): Measure the front of the chest with arms holding each other, from armpit to armpit.
F. Maximum Chest Circumference: Measure around the chest at its fullest point, usually while breathing in.
G. Waist Circumference: Measure around the narrowest part of your waist, above the hips.
H. Maximum Hip Circumference: Measure around the widest part of your hips, usually at the level of your buttocks.
U. Neckline to Waistline: Measure from the lowest point of the neckline just under the neck to the waistline, usually above the belly button.
X. Neckline to Groin Line: Measure from the lowest point of the neckline just under the neck to the groin line, where you want the armor to end. This helps ensure the pelvis is covered.
Arms Armor
General Recommendations for Measurements for Arms Armor:
Clothing: Measurements should be taken wearing the gambeson you intend to wear with the armor. Sweaters or jackets will not accurately reflect the thickness of the gambeson and could lead to ill-fitting armor.
Bare Arms: If you are ordering both arms and padding together, measuring your bare arms is acceptable. However, please clearly indicate on the measurement sheet that the measurements are for bare arms.
Measurements: Take all measurements with a flexible measuring tape, snug but not tight.
Additional Notes:
- If your gambeson has any unusual features that might affect the fit of the armor, please describe them in the notes section.
- For best results, have someone else take your measurements.
- Feel free to include any other measurements you think might be helpful, such as elbow circumference.
Required measurements:
A. Weight: Measure your weight in kilograms or pounds.
B. Height: Measure your full height from head to toe.
M. Wrist Circumference: Measure above the gambeson, not on top of any leather straps.
N. Forearm Circumference: Measure the fullest part of the forearm.
V. Bicep Circumference: Measure the fullest part of the bicep, slightly flexed.
W. Forearm Length: Measure from the wrist joint to the tip of the elbow.
T. Shoulder Length: Measure from the point where the shoulder meets the neck to the tip of the elbow.
Axes
A standard one-handed axe is intended primarily for buhurt melees and group battles. It is not permitted in sword and shield, sword and buckler, or longsword duel categories. However, a Type 3 long axe may qualify for the polearm duel category if it meets the required weight, length, edge, safety, and authenticity standards. Final approval is always given during the tournament weapon inspection.
A strong wooden haft is the correct choice because steel hafts are prohibited under current tournament requirements. A modern material may be accepted only if it reproduces the appearance, handling, and stiffness of wood. The haft must be strong enough for full-contact combat, and the steel axe head must be fixed with at least two securing methods, such as wedges, glue, straps, rivets, nails, or langets.
Yes, a buhurt axe may have a rebated hook or hammerhead on the non-striking side. However, it must not have any sharp or pointed edges, and striking an opponent with the hook or hammerhead is prohibited. Every point on the permitted striking edge must form an angle greater than 90 degrees. The complete weapon must pass the tournament equipment inspection before use.
A Type 2 hafted axe must weigh between 0.7 and 1.3 kg. These axes measure 50 to 90 cm and are commonly used as compact, one-handed weapons. A Type 3 long axe must weigh between 1.3 and 2.5 kg and measure 90 to 130 cm. A permissible upward measurement tolerance of 100 g applies, but fighters should select a weight they can control safely throughout a full battle.
While we understand the appeal of a sharp blade, we strongly advise against it for several reasons. First, sharpening our swords could compromise the carefully crafted bluntness designed for safe sparring. This can increase the risk of injury not only for yourself but also for your opponent. Second, depending on your location, owning or carrying a sharpened sword might violate local laws and regulations. Therefore, we recommend sticking with our safe and legal blunted swords to enjoy armored combat without any unnecessary risks or complications.
Absolutely not! All our swords/falchions/axes and other weapons are carefully blunted and rounded according to the strictest armored combat league regulations. We prioritize your safety above all else, so you can experience the power and thrill of armored combat without worrying about accidental cuts or punctures. Remember, sharp swords are not only dangerous and prohibited in armored combat but also often restricted by local laws, so our blunted blades ensure you train and fight with confidence and peace of mind.
Body Armor
Before we begin, ensure you have your actual padded under-armor kit ready: gambeson, chausses, and c-belt. Using anything else like modern jackets, sweatpants, or layered sweaters won’t provide the accurate measurements needed for fitting your brigantine. If you’re planning to order both your padded kit and brigantine from our shop simultaneously, sending your bare body measurements is acceptable. However, please inform us of this so we can properly adjust the sizing based on your true dimensions.
Additional Tips:
- When taking measurements, stand relaxed with good posture.
- Make sure the measuring tape is snug but not tight.
- If you’re unsure about any measurements, it’s always best to err on the side of being slightly larger.
- Consider having someone else take your measurements for greater accuracy.
This table should give you a good starting point for taking all the necessary measurements for your medieval body armor. Remember, precise measurements are crucial for a comfortable and well-fitting suit of armor.
Required measurements:
A. Body Weight: Stand on a scale without shoes or other heavy clothing.
B. Full Body Height: Stand straight, barefoot, with your back against a wall. Have someone measure from the top of your head to the floor.
D. Neck Circumference: Measure around the base of the neck, just above the collarbone.
E. Shoulder Width (Back): Measure from the seam of one shoulder pad to the seam of the other, across the back.
R. Shoulder Width (Front): Measure from the seam of one shoulder pad to the seam of the other, across the chest.
O. Chest Width (Arms Together): Measure the front of the chest with arms holding each other, from armpit to armpit.
F. Maximum Chest Circumference: Measure around the chest at its fullest point, usually while breathing in.
G. Waist Circumference: Measure around the narrowest part of your waist, above the hips.
H. Maximum Hip Circumference: Measure around the widest part of your hips, usually at the level of your buttocks.
U. Neckline to Waistline: Measure from the lowest point of the neckline just under the neck to the waistline, usually above the belly button.
X. Neckline to Groin Line: Measure from the lowest point of the neckline just under the neck to the groin line, where you want the armor to end. This helps ensure the pelvis is covered.
Brigandines
A brigandine does not receive automatic approval simply because it was designed for armored combat. Tournament officials consider its historical source, period, regional style, plate layout, coverage, materials, and compatibility with the rest of the armor.
MedievalExtreme builds brigandines for full-contact combat and bases each model on historical references. However, leagues and individual events may apply different or updated requirements. Confirm your chosen model with the relevant authenticity committee before ordering if you plan to compete under specific BI (ex., HMB), IMCF, or other league rules.
The brigandine should sit securely over the gambeson without compressing or flattening its padding. It should protect the chest, back, sides, and required lower torso area while allowing normal breathing.
Test the fit by raising your arms, twisting, crouching, bending, and assuming your fighting stance. The brigandine should not shift excessively or press into the neck, hips, or armpits.
Take measurements while wearing your actual gambeson. If you order the brigandine and padding together, measure your bare body and clearly tell us. We will add the required fitting allowance.
Choose hardened steel if you prioritize durability, straightforward maintenance, and a lower purchase price. Steel works well for regular training, hard melees, and fighters who do not mind carrying additional weight.
Choose titanium if you want to reduce fatigue and improve mobility during long tournaments. Depending on the model, titanium can reduce brigandine weight by approximately 30 to 40 percent. It costs more, but the lower weight can make a noticeable difference during repeated fights.
Weight depends on the design, size, plate layout, coverage, and material. For example, an XL Chalkis Brigandine weighs approximately 8.54 kg in hardened steel and 5.42 kg in titanium. An XL Wimbledon Brigandine weighs approximately 8.58 kg in steel and 6 kg in titanium.
Smaller sizes and brigandines with less coverage may weigh less. Always check the specifications of the individual model rather than relying on a general category weight.
Clothes
To prolong the lifespan of your medieval combat boots, it is important to clean and condition them regularly. Use a soft brush to remove any dirt or debris, and apply a leather conditioner to keep the leather supple and prevent cracking. Avoid exposing the boots to excessive moisture or extreme temperatures, as this can damage the leather and compromise its structural integrity. Try not to dry them above the open fire, usually, it doesn’t make them better.
To get custom-sized shoes, it’s crucial to measure your feet correctly for a perfect fit, particularly for armored combat boots. You should measure your feet with the socks and padded chausses you wear during combat.
Steps:
- Prepare a sheet of paper, a pen or pencil, and a ruler. Wear the socks and padded chausses you wear during combat.
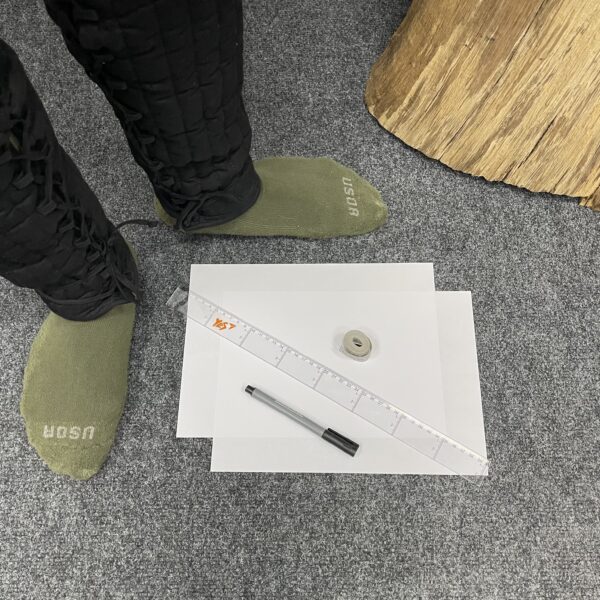
2. Place the paper on a flat surface. Stand on the paper with your weight evenly distributed.
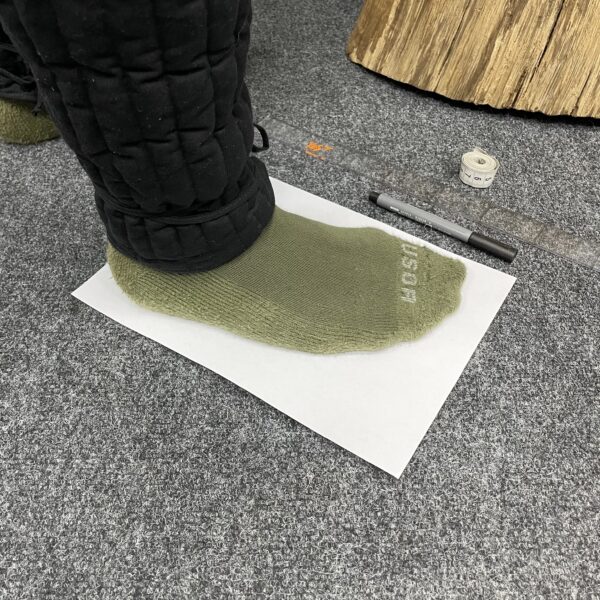
3. Trace around your foot with a pen perpendicular to the paper, keeping it close to your foot.
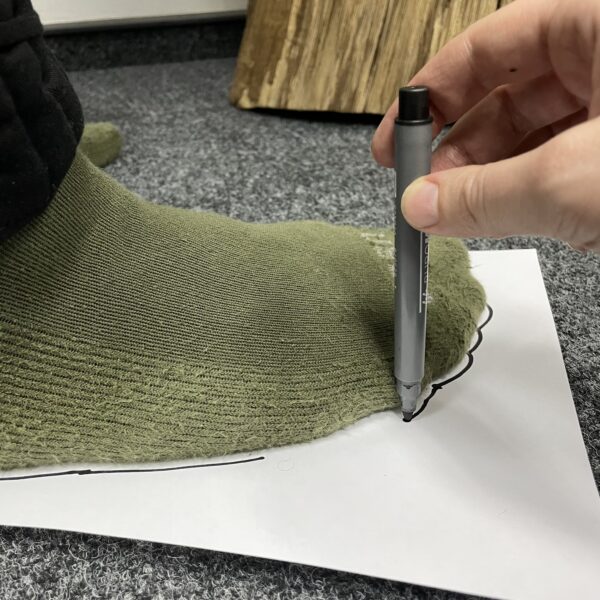
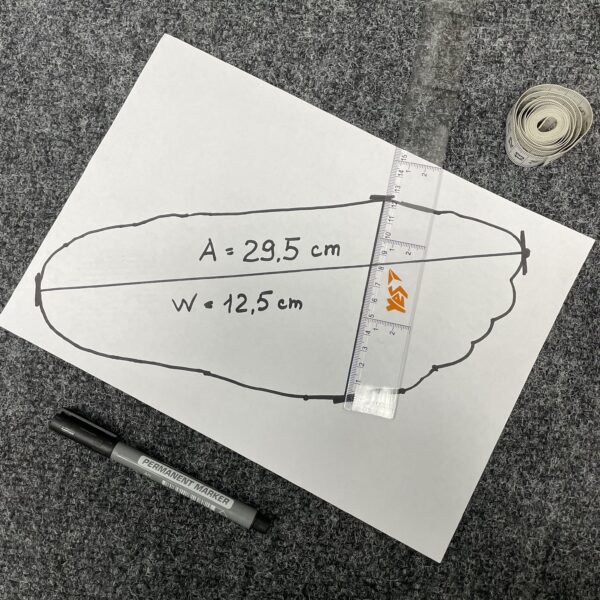
4. Measure the length of your foot from the longest point on your heel to the longest point on your toes using a ruler. Record this measurement.
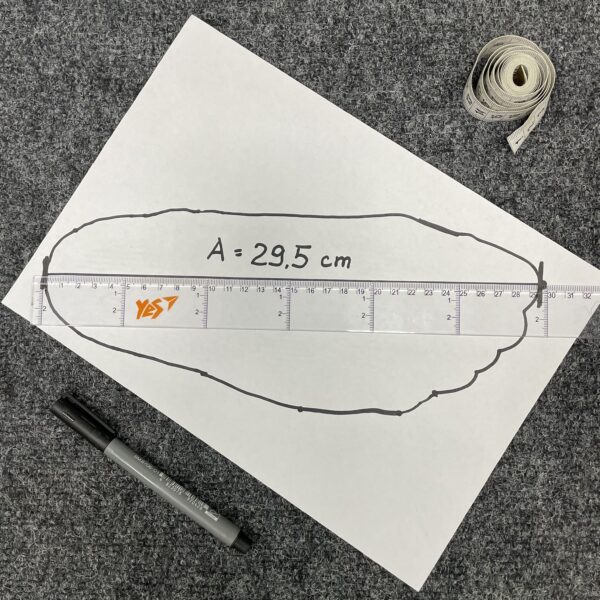
5. Measure the width of your foot at the widest part, usually around the ball of your foot, and note it down.
6. Measure the circumference of B (the area where you measured width), C (the area where your foot meets your leg), and D (your ankle) using a measuring tape. Write down these measurements.
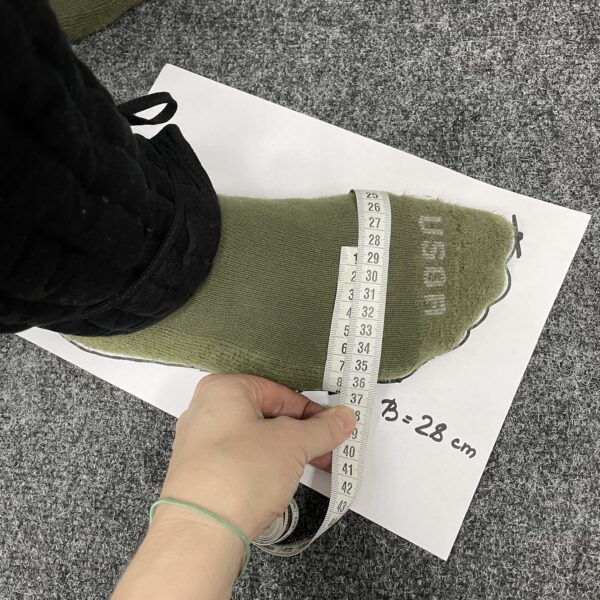
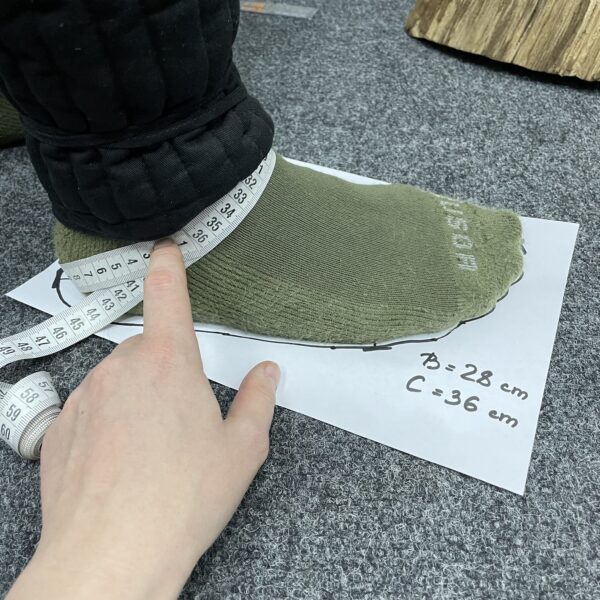
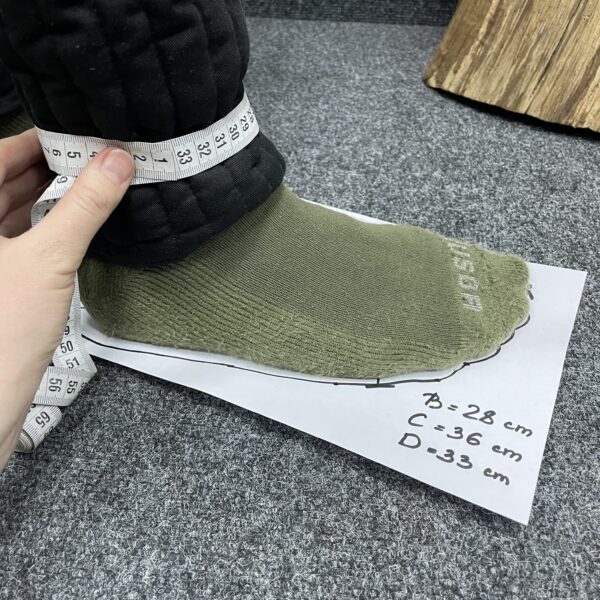
7. Note any other details of your feet for your custom-sized shoes, such as medical braces, or surgeons.
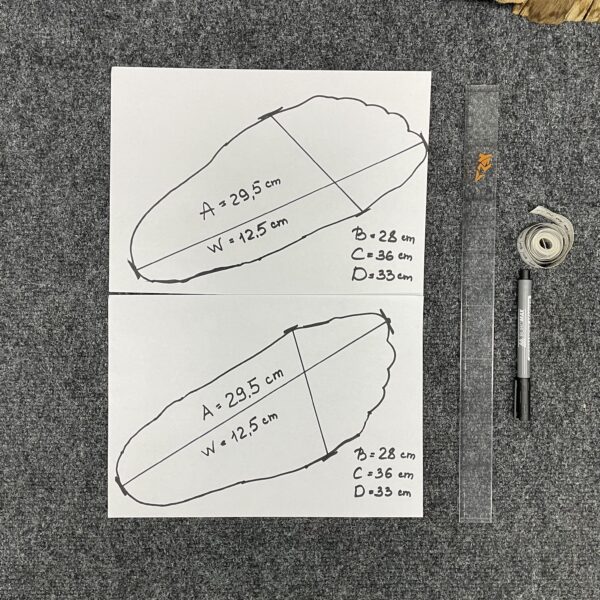
Important points on how to measure your feet for custom-sized shoes:
- Measure with socks and padded chausses worn during combat.
- Trace the foot with a pen perpendicular to the paper.
- Measure foot length from heel to toe and width at the widest part.
- Measure the circumference of B, C, and D for both feet.
- Note any other requests or details.
Conclusion:
With accurate measurements following these steps, you can get custom-sized shoes that fit your needs perfectly. If you have questions or require assistance, don’t hesitate to consult us.
Cotte d'arme
The tabard should follow the outline of the armor without restricting the shoulders, arms, or torso. It needs enough room for padding and plates but should not hang so loosely that opponents can easily grab or snag it.
Take measurements while wearing your complete brigandine, shoulder armor, and under-armor padding. =
Yes. You can request team colors, halves, quarters, custom layouts, and selected embroidered elements, depending on the design. Provide a clear, high-resolution image and accurate color references before production. Complex artwork may require simplification so it remains recognizable and durable.
By submitting a logo, coat-of-arms, or other artwork, you confirm that you own the design or have permission to reproduce it. MedievalExtreme does not claim ownership of submitted artwork and accepts no responsibility for third-party copyright, trademark, or heraldic rights disputes.
Two layers of durable cotton provide a practical combination of strength, flexibility, and easy maintenance. This construction handles contact with armor edges, grappling, falls, and repeated tournament use better than thin costume fabric.
Heavy linen also works well and offers a lighter historical appearance. Wool provides good durability and structure but can feel warmer and absorb more moisture. Regardless of the material, reinforced seams and a proper fit have a major effect on the tabard’s lifespan.
Not in every category or tournament. A cotte d’arme is usually optional unless the event, league, or team regulations require one. However, any visible tabard must match the historical period and regional style of the fighter’s armor. Check the current authenticity requirements before ordering a design for competition.
Falchions
While we understand the appeal of a sharp blade, we strongly advise against it for several reasons. First, sharpening our swords could compromise the carefully crafted bluntness designed for safe sparring. This can increase the risk of injury not only for yourself but also for your opponent. Second, depending on your location, owning or carrying a sharpened sword might violate local laws and regulations. Therefore, we recommend sticking with our safe and legal blunted swords to enjoy armored combat without any unnecessary risks or complications.
Absolutely not! All our swords/falchions/axes and other weapons are carefully blunted and rounded according to the strictest armored combat league regulations. We prioritize your safety above all else, so you can experience the power and thrill of armored combat without worrying about accidental cuts or punctures. Remember, sharp swords are not only dangerous and prohibited in armored combat but also often restricted by local laws, so our blunted blades ensure you train and fight with confidence and peace of mind.
Gambison
A custom-fitted gambeson provides the best result when time is not a concern. It allows us to adjust the garment to your measurements, armor, movement, and preferred arming-point positions.
However, our stock padded kits use sizing developed through years of armored-combat experience. A correctly selected stock size can also fit well and provides a practical time-saving option when you need equipment quickly.
If you choose a stock kit, provide your height, weight, chest, waist, and hip measurements so we can help select the appropriate size. If your schedule allows for production time, we recommend a custom gambeson for the most precise fit.
Air the gambeson immediately after training and let it dry completely. For light dirt, use a damp cloth and mild soap. Follow the product’s care instructions before washing the entire garment.
Avoid machine washing because it may twist the quilted layers and damage the stitching. When full washing is necessary, soak the gambeson in warm water with mild detergent. Rinse gently without wringing or twisting. Dry it flat on a towel or rack, away from strong heat or fire.
The historical terms often overlap. A gambeson usually describes a heavier quilted defensive garment that could provide protection alone or beneath armor. An aketon often refers to a lighter padded jacket worn primarily under mail or plate armor.
Modern manufacturers and reenactors may use both names for similar garments. For buhurt, focus on the padding density, materials, cut, mobility, and compatibility with your armor rather than the product name.
There is no universal thickness for a buhurt gambeson. The correct amount of padding depends on its density, your armor, and the preferred armored combat discipline. Dense wool batting can provide effective cushioning with less bulk than several loose fabric layers.
The gambeson should reduce pressure and fill gaps without restricting movement. Excessive thickness can trap heat, limit the shoulders, and make the armor fit incorrectly. Always match the gambeson to the armor you plan to wear.
Greaves
Wear fitted padded chausses or dedicated under-armor padding that cushions the shin, calf, and ankle without creating excessive bulk. The padding should remain stable during movement and prevent direct contact between the metal plates and your leg. Use the same padding for measurements and combat. If purchasing new padding with the greaves, provide bare-leg measurements so both pieces can be adjusted as one system.
Take measurements while wearing the exact leg padding you currently use. Provide your height, body weight, widest calf circumference (K), narrowest ankle circumference (L), and knee-to-ankle length(Z). Keep the leg relaxed and the measuring tape snug without compressing the padding. If you order padding and greaves together, measure your bare legs and mention the included padding in the order notes. MedievalExtreme will add the required allowance.</p>
Titanium greaves are generally 20 to 40 percent lighter than an equivalent hardened-steel model. The exact reduction depends on the construction, size, number of plates, straps, and additional components. Brigandine greaves usually remain closer to the lower end of this range because their fabric shell, lining, straps, and hardware retain the same weight. For example, MedievalExtreme brigandine greaves weigh approximately 2.71 kg in steel and 2.05 kg in titanium for XL size.
Yes, but their legality depends on the historical period of the armor kit. Current Buhurt International rules classify open, one-panel greaves as half-greaves. They are approved for 14th-century and Transitional armor but denied for 15th-century armor. The greave must cover the entire front of the lower leg, follow its anatomical shape, protect the ankle bone, and be supported by appropriate historical sources.
Halberds
While we understand the appeal of a sharp blade, we strongly advise against it for several reasons. First, sharpening our swords could compromise the carefully crafted bluntness designed for safe sparring. This can increase the risk of injury not only for yourself but also for your opponent. Second, depending on your location, owning or carrying a sharpened sword might violate local laws and regulations. Therefore, we recommend sticking with our safe and legal blunted swords to enjoy armored combat without any unnecessary risks or complications.
Absolutely not! All our swords/falchions/axes and other weapons are carefully blunted and rounded according to the strictest armored combat league regulations. We prioritize your safety above all else, so you can experience the power and thrill of armored combat without worrying about accidental cuts or punctures. Remember, sharp swords are not only dangerous and prohibited in armored combat but also often restricted by local laws, so our blunted blades ensure you train and fight with confidence and peace of mind.
Hand armor
A, B and F – are measurements for the gauntlets required to make them or find out the right size.
Gather your tools:
- Paper
- Pen
- Flexible measuring tape
Step 1: Trace your handprint:
Lay your hand flat, fingers relaxed. Carefully outline your entire hand, including fingertips and wrist.
Step 2: Palm length:
Grab the measuring tape and measure the straight line from your middle finger’s tip to your palm’s base at the wrist. This is your palm length (A).
Step 3: Knuckle width:
Using the outline you drew on the paper in step 1, measure the straight-line distance across the knuckles (B).
Step 4: Palm circumference:
Keep your fingers relaxed and together. Wrap the tape snugly around your knuckles This is your palm circumference (F).
Pro tips for perfect sizing:
- Dominant hand: If one hand is larger, mark it for specific size checks.
- Size up: When between sizes, opt for slightly larger measurements for the gauntlets
Hand-and-Half Swords
Not in a standard Buhurt International sword and buckler duel. That category requires a Type 1 bladed weapon, while a tournament hand-and-half sword normally falls under Type 2. Fighters should pair a buckler with an approved one-handed sword. Other leagues or training formats may use different rules, so check the event regulations before choosing your equipment.
Type 2 swords must weigh between 1.7 and 2.3 kg. Many duel fighters prefer a sword near the lower or middle part of this range because it offers faster recovery and better control. However, the ideal weight depends on the fighter’s strength and technique.
A balance point closer to the guard improves maneuverability. A more forward balance adds striking momentum but increases fatigue. Profight and Outrance categories may impose specific balance requirements.
Yes, a hand-and-half sword may qualify for profight or Outrance if it meets the relevant technical requirements. The weapon must remain within its Type 2 measurements and pass inspection. Outrance rules also require a minimum balance point of 15 cm from the top of the handle for men’s fights and 10 cm for women’s fights. Always confirm the requirements of the specific league and event.
The terms often overlap. A hand-and-half sword, also called a bastard sword, has an extended grip that supports one-handed or two-handed control. “Longsword” refers to a broader group of long-bladed swords designed primarily for two-handed use. In modern buhurt rules, both commonly fall under the Type 2 bladed weapon category when they meet the required dimensions and weight.
Heater Shields
Yes. MedievalExtreme heater shields can be ordered in a preferred color and personalized with a custom logo, heraldry, or reference design. The artwork must match the historical style of your armor kit and comply with tournament rules.
By submitting a logo, coat of arms, artwork, trademark, or other design, you confirm that you own it or have all permissions required for MedievalExtreme to reproduce it on your order. You retain ownership of the submitted design and grant MedievalExtreme only the limited permission needed to manufacture the customized product. MedievalExtreme does not acquire ownership or intellectual property rights in customer-supplied designs. To the extent permitted by applicable law, the customer is responsible for third-party claims resulting from unauthorized or infringing material.
MedievalExtreme may refuse designs that appear unlawful, offensive, clearly modern, or incompatible with tournament requirements. Black and yellow stripes, chevrons, and designs resembling marshal symbols are prohibited.
Leather Enarmes (straps), including an adjustable elbow strap and hand grip, hold the shield close to the arm and provide stable defense and control. A center grip allows quicker repositioning and greater wrist movement. Under current Buhurt International rules, a central handle on a wooden heater shield must also be wooden. A shield boss is permitted only when supported by appropriate historical sources.
A heater shield has no fixed lifespan because durability depends on impact frequency, fighting style, construction, and maintenance. MedievalExtreme shields use a wooden or plywood core, fabric covering, and a reinforced leather edge with hidden rope. An additional plywood layer is available for demanding use. Inspect the leather or rawhide edge, straps, core, and fasteners before every event. Replace the shield if cracks or unsafe exposed areas appear.
Under Buhurt International rules, a heater shield must measure 55 to 75 cm long and 30 to 65 cm wide. It must be wooden, curved rather than flat, and have a rectangular upper section with a pointed bottom. The complete shield must weigh no more than 5 kg. Its proportions should match historical sources and the fighter’s armor period.
Helmets
To ensure the helmet for armored combat fits correctly, take your measurements without any padding, using a tailor’s measuring tape.
Refer to the diagram:
- A – Maximum head circumference measured horizontally around the widest part of the head (typically from the forehead across the back of the skull).
- B – Vertical distance from the center of the eye level straight down to the top of the shoulder. This helps us determine the appropriate helmet length to ensure full coverage without restriction.
For the best fit, please double-check your measurements and include them in centimeters.
If there are any specific considerations — such as plans to wear additional padding, a request for reinforced vision protection (e.g., extra eye bars), or anything else that might influence the build — please mention this in the order comments during checkout. We take these details into account during production to ensure your helmet arrives ready and optimized for use.
No additional purchases are needed. All helmets are supplied fully equipped and ready for training or competition use. This includes:
- Internal liner system
- All necessary leather straps (including Simon strap)
- Neck protection in the form of a mounted aventail with integrated steel or titanium plates
Each helmet arrives ready for immediate use upon delivery — no extra assembly or upgrades required.
Classic bascinets are one of the most versatile and widely accepted choices in armored combat. Whether it’s a clapvisor, spoletto, nasal bascinet, or bascinet with a cross, these models offer solid protection — especially around the eyes — and are compatible with most common armor kits used in tournaments.
Their design balances protection, breathability, and visibility, making them a reliable choice for both new and experienced fighters.
Hip and waist protection
Before we begin, ensure you have your actual padded under-armor kit ready: gambeson, chausses, and c-belt. Using anything else like modern jackets, sweatpants, or layered sweaters won’t provide the accurate measurements needed for fitting your brigantine. If you’re planning to order both your padded kit and brigantine from our shop simultaneously, sending your bare body measurements is acceptable. However, please inform us of this so we can properly adjust the sizing based on your true dimensions.
Additional Tips:
- When taking measurements, stand relaxed with good posture.
- Make sure the measuring tape is snug but not tight.
- If you’re unsure about any measurements, it’s always best to err on the side of being slightly larger.
- Consider having someone else take your measurements for greater accuracy.
This table should give you a good starting point for taking all the necessary measurements for your medieval body armor. Remember, precise measurements are crucial for a comfortable and well-fitting suit of armor.
Required measurements:
A. Body Weight: Stand on a scale without shoes or other heavy clothing.
B. Full Body Height: Stand straight, barefoot, with your back against a wall. Have someone measure from the top of your head to the floor.
D. Neck Circumference: Measure around the base of the neck, just above the collarbone.
E. Shoulder Width (Back): Measure from the seam of one shoulder pad to the seam of the other, across the back.
R. Shoulder Width (Front): Measure from the seam of one shoulder pad to the seam of the other, across the chest.
O. Chest Width (Arms Together): Measure the front of the chest with arms holding each other, from armpit to armpit.
F. Maximum Chest Circumference: Measure around the chest at its fullest point, usually while breathing in.
G. Waist Circumference: Measure around the narrowest part of your waist, above the hips.
H. Maximum Hip Circumference: Measure around the widest part of your hips, usually at the level of your buttocks.
U. Neckline to Waistline: Measure from the lowest point of the neckline just under the neck to the waistline, usually above the belly button.
X. Neckline to Groin Line: Measure from the lowest point of the neckline just under the neck to the groin line, where you want the armor to end. This helps ensure the pelvis is covered.
Legs Armor
Weight depends on size, material, coverage, and construction. An XL Basic Floating Legs Aurora set weighs approximately 6.17 kg in hardened steel. An articulated Apex set weighs approximately 8.63 kg.
An XL floating brigandine leg set weighs approximately 7.98 kg in hardened steel or 6.40 kg in titanium. These figures include cuisses, poleyns, and greaves but may not include sabatons, padding, or suspension equipment. Always check the specifications of the individual set.
We recommend purpose-made padded chausses or another approved underarmor layer. Regular sport padding may shift, create pressure points, or add the wrong amount of thickness. Visible modern materials may also fail authenticity requirements.
If you plan to use existing sport padding, confirm it with the relevant tournament officials. Take every armor measurement while wearing that exact padding and your combat footwear. If you order the leg armor and padding together, measure your bare legs and tell us. We will adjust the size accordingly.
Most floating cuisses attach through reinforced leather arming points to a lendenier or purpose-made arming belt. Lacing, also called pointing, carries the armor’s weight and keeps the cuisses at the correct height.
Additional straps stabilize the thighs and knees, but they should not carry the entire load. A regular clothing belt may twist, slide, or sag under heavy leg armor. A reinforced lendenier or C-belt provides better support.
Fighters need continuous protection for the thighs, knees, shins, and feet. This normally includes cuisses, poleyns, greaves, and sabatons. The components must overlap correctly and prevent exposed gaps during movement.
Under current rules, a fighter may be grounded if an equipment failure affects a thigh protector, knee cop, shin protector, or sabaton. The armor must also match the applicable safety and authenticity requirements.
General Recommendations for Measurements for Legs Armor:
Clothing: Measurements should be taken wearing the padded chausses you intend to wear with the armor. Sweatpants or jeans will not accurately reflect the thickness of the padded chausses and could lead to ill-fitting armor.
Bare Legs If you are ordering both legs and padding together, measuring your bare legs is acceptable. However, please clearly indicate on the measurement sheet that the measurements are for bare legs.
Measurements: Take all measurements with a flexible measuring tape, snug but not tight.
Additional Notes:
- Take all measurements with padded chausses or similar under-the-legs armor and shoes on.
- Ensure you or the person being measured is standing straight and relaxed with feet shoulder-width apart.
- Use a flexible measuring tape for accurate circumference measurements.
- Consider additional measurements if specific armor requires them (e.g., knee joint width, foot length).
- This table provides a basic guide and adjustments might be necessary based on individual body shape and specific armor design.
Required measurements:
A. Weight: Measure your weight in kilograms or pounds without wearing any armor.
B. Height: Stand tall and measure the distance from the top of your head to the soles of your feet.
I. Maximal thigh circumference: Find the widest part of your thigh, usually just above mid-thigh. Wrap the tape measure snugly but not tight.
J. Thigh circumference above knee: Measure the circumference about 10 cm above your kneecap with the tape snug but not tight.
K. Calves: Measure the widest point around your calf muscle with the tape snug but not tight.
L. Ankle: Measure the narrowest part of your ankle just above the ankle bone with the tape snug but not tight.
AA. Hip to Knee: Stand with your leg relaxed. Locate the bony bump on the side of your hip bone (greater trochanter) and the center of your kneecap. Measure the distance between these points while keeping your leg straight.
Z. Knee to Ankle: Stand with your leg relaxed. Locate the center of your kneecap and the highest point of your ankle bone. Measure the distance between these points while keeping your leg straight.
Medieval Footwear
Start by wearing the boots at home for short periods with your combat socks and padded chausses. Gradually increase the wearing time as the leather adapts to your feet. Practice walking, crouching, and changing direction, but avoid full-intensity training until the boots feel comfortable.
Use a suitable leather conditioner to keep the material flexible. Do not soak the boots or dry them near an open fire, radiator, or other strong heat source. Stop and check the fit if you notice persistent pressure, numbness, or severe rubbing.
Yes. Combat boots or medieval shoes create the base for sabatons. The sabaton plates should follow the shape of the foot while allowing the ankle and toes to move naturally. Test the complete combination before fighting. Make sure the straps remain secure and that no gaps appear between the sabatons, boots, and greaves. Order or size these elements together whenever possible.
Choose a low-profile anti-slip sole that provides traction without catching on the arena surface. Deep lugs can restrict natural foot movement and may create additional stress during falls or rapid turns. Studded and spiked soles are not permitted. Always inspect the sole before an event and remove any stones or debris that could reduce grip.
Standard modern boots generally cannot serve as visible tournament footwear. Their shape, materials, branding, or deep tread may fail authenticity requirements. Buhurt footwear should match the historical style of the fighter’s armor. Current rules require low-profile soles without modern lugs, studs, or spikes. Ask the tournament’s authenticity officers before using any modern or modified footwear.
To prolong the lifespan of your medieval combat boots, it is important to clean and condition them regularly. Use a soft brush to remove any dirt or debris, and apply a leather conditioner to keep the leather supple and prevent cracking. Avoid exposing the boots to excessive moisture or extreme temperatures, as this can damage the leather and compromise its structural integrity. Try not to dry them above the open fire, usually, it doesn’t make them better.
To get custom-sized shoes, it’s crucial to measure your feet correctly for a perfect fit, particularly for armored combat boots. You should measure your feet with the socks and padded chausses you wear during combat.
Steps:
- Prepare a sheet of paper, a pen or pencil, and a ruler. Wear the socks and padded chausses you wear during combat.
2. Place the paper on a flat surface. Stand on the paper with your weight evenly distributed.
3. Trace around your foot with a pen perpendicular to the paper, keeping it close to your foot.
4. Measure the length of your foot from the longest point on your heel to the longest point on your toes using a ruler. Record this measurement.
5. Measure the width of your foot at the widest part, usually around the ball of your foot, and note it down.
6. Measure the circumference of B (the area where you measured width), C (the area where your foot meets your leg), and D (your ankle) using a measuring tape. Write down these measurements.
7. Note any other details of your feet for your custom-sized shoes, such as medical braces, or surgeons.
Important points on how to measure your feet for custom-sized shoes:
- Measure with socks and padded chausses worn during combat.
- Trace the foot with a pen perpendicular to the paper.
- Measure foot length from heel to toe and width at the widest part.
- Measure the circumference of B, C, and D for both feet.
- Note any other requests or details.
Conclusion:
With accurate measurements following these steps, you can get custom-sized shoes that fit your needs perfectly. If you have questions or require assistance, don’t hesitate to consult us.
Medieval Furniture
We do not currently add custom team heraldry to medieval furniture. However, we can change the furniture color according to your preference upon request. Contact MedievalExtreme before ordering to discuss the preferred color and available finishing options.
Armor can be placed in a medieval chest for transport or temporary storage, but a chest is not essential. Equipment should be cleaned and completely dried before being enclosed. An armor stand is usually more convenient at camp because it keeps the equipment accessible and allows moisture to evaporate.
Folding chairs and furniture that can be disassembled are the easiest options to transport. Most MedievalExtreme furniture can be folded or assembled directly at the event. When assembly is required, we provide the necessary screws and tools so you can prepare your camp furniture on site.
Medieval furniture is generally not required at buhurt tournaments, but it makes a camp more organized and atmospheric. Historically styled chairs, stands, and shelves help create a convincing setting. For reenactment events, period-appropriate furniture may be preferred or required, depending on the organizer’s authenticity standards.
Swords
A buhurt sword does not have a fixed service life. Durability depends on training frequency, fighting style, maintenance, storage, and the types of weapons it contacts. A properly maintained sword used mainly in duels may serve for several fighting seasons, while frequent use in mass battles can shorten its lifespan.
Inspect the blade after every event for cracks, deep dents, permanent bends, or excessive edge deformation. Also check the guard, grip, and pommel for movement. A damaged or loose sword should be repaired or replaced before further use.
For sword and shield or sword and buckler duels, a one-handed sword is usually the better choice for a beginner. It is lighter, easier to control, and allows the shield to provide additional defense. A longsword is suitable for fighters who specifically want to train for the longsword duel category, but it requires two-handed control, good distance management, and more developed defensive technique.
Swords are generally better suited to duels than mass battles. In melees, sword blades may be heavily damaged by repeated collisions with polearms and axes. A beginner preparing for group combat may prefer a basic falchion, mace, or axe, especially if their fighting style includes close-range wrestling.
Tournament swords are typically made from tempered high-carbon steel. Proper heat treatment gives the blade the necessary combination of hardness, durability, and limited flexibility for full-contact fighting. Steel grade alone does not determine quality. Blade geometry, tempering, edge thickness, and the construction of the hilt, guard, and pommel are equally important.
A Type 1 sword, including an arming sword, should weigh between 1.1 and 1.7 kg. A Type 2 longsword should weigh between 1.7 and 2.3 kg, while a Type 3 two-handed sword may weigh between 2.3 and 3 kg. Tournament regulations allow an upward measurement tolerance of 100 g, but we recommend choosing a sword comfortably within the specified range.
While we understand the appeal of a sharp blade, we strongly advise against it for several reasons. First, sharpening our swords could compromise the carefully crafted bluntness designed for safe sparring. This can increase the risk of injury not only for yourself but also for your opponent. Second, depending on your location, owning or carrying a sharpened sword might violate local laws and regulations. Therefore, we recommend sticking with our safe and legal blunted swords to enjoy armored combat without any unnecessary risks or complications.
Absolutely not! All our swords/falchions/axes and other weapons are carefully blunted and rounded according to the strictest armored combat league regulations. We prioritize your safety above all else, so you can experience the power and thrill of armored combat without worrying about accidental cuts or punctures. Remember, sharp swords are not only dangerous and prohibited in armored combat but also often restricted by local laws, so our blunted blades ensure you train and fight with confidence and peace of mind.
Thank you page
We manually double-check measurements before sending custom armor to production.
We also use your height and weight to help detect measurements that may look incorrect or unusual. For example, if one measurement does not match the rest of the body proportions, we may contact you for confirmation.
However, it is very important to tell us how the measurements were taken: bare body, over gambeson, over padded pants, over shoes, or with extra protective items. Special padding or unusually thick protection can affect the final fit.
Yes, but please contact us as soon as possible.
You can message us by email, WhatsApp, or social media and ask to update the shipping address.
If the order has not been shipped yet, we can usually update the address. Once the parcel has already been shipped, address changes may be limited or impossible depending on the carrier.
Yes, some orders are shipped in several packages.
This usually happens because of box size limits, item size, weight, or because different items from the same order are finished at different times.
If you want your order to be shipped only when everything is ready, or if you prefer separate shipping as soon as items are finished, please contact us and let us know.
After your order is placed, we manually review the order details, selected options, and measurements if they were attached. If everything is clear, we forward the order to the workshop. If measurements or order details are missing, unclear, or unusual, we will contact you by email before production starts.
Once the item is finished, it goes through final checking and packing before shipping.
If your item requires custom sizing, yes. If you have already attached measurements during checkout, we will check them manually. If you did not attach measurements, or if something important is missing, we will contact you by email with a measurement request.
Please make sure to check your inbox and spam folder after placing the order.
Production time depends on the item, material, workshop queue, and custom options selected.
You can check the general production and shipping information here:
https://medievalextreme.com/shipping-and-payment/
Please note that handmade armor is not a mass-produced warehouse item. Each custom piece needs time for production, assembly, checking, and packing.
Yes.
Extra custom options, unusual sizing, special requests, or complex changes can increase production time.
We always try to complete orders as close as possible to the stated production time, but heavily customized orders may take longer than standard versions.
Once your order is shipped, you will receive tracking information by email.
Tracking may take some time to update after the parcel is handed to the carrier, so please do not worry if the tracking page does not show movement immediately.
Tools of pain
Yes. Duel categories have specific weapon requirements. Sword and shield or sword and buckler duels use Type 1 bladed weapons, longsword duels use Type 2 bladed weapons, and polearm duels use approved Type 3 or Type 4 hafted weapons. Melee categories such as 5v5 and mass battles permit a broader selection of historically documented weapons. Always check the current tournament rules because a weapon accepted for one category may not be permitted in another.
For duels, a one-handed sword is a good starting choice because it offers predictable balance and helps develop distance, defense, and accurate striking. For melees and mass battles, swords are less practical because their blades may be heavily damaged by polearms and repeated weapon collisions. A basic falchion is often a more durable and versatile option. Fighters who prefer close-range wrestling may find a compact mace or axe more suitable, provided it meets the requirements of their category.
The radius of every striking and non-striking edge must be more than 10 mm. Bladed weapons must also have an edge thickness of at least 2 mm. Sharp corners are prohibited, and every point along the striking edge of an axe or other hafted weapon must form an angle greater than 90 degrees. Meeting these measurements does not guarantee approval if the weapon is damaged, poorly balanced, or otherwise considered unsafe.
Permitted buhurt weapons include blunt swords, falchions, longswords, axes, long axes, maces, glaives, halberds, and other approved polearms. Each weapon must match an accepted category, historical source, weight range, and size limit. All striking and non-striking edges must be rebated. The sharp, pointed, or stabbing-only weapons such as spears are prohibited. Every weapon must pass the tournament inspection before entering the list.
Training Swords
A training sword has no fixed service life. Its durability depends on training frequency, striking power, target material, maintenance, and storage. Pell work with a suitable target usually causes less unpredictable damage than uncontrolled steel-on-steel sparring.
Inspect the blade, edges, guard, grip, and pommel after every session. Stop using the sword if you find cracks, severe dents, permanent bends, or loose components. Regular cleaning and dry storage will help prevent corrosion and extend its useful life.
A sword used only for solo drills or pell work does not need tournament approval. However, it must remain structurally sound and safe for its intended training method.
A training sword used for armored sparring, competition, or tournament-style fights must meet the applicable league requirements. It must also pass the event’s weapon inspection. Buhurt International (ex HMB), IMCF, and local clubs may apply different standards, so check the relevant rules before use.
There is no fixed weight difference. A training arming sword may weigh within the same range as a tournament sword. For example, the MedievalExtreme training arming sword weighs approximately 1.5 kg, while Type 1 tournament swords range from 1.1 to 1.7 kg.
The main differences involve blade thickness, steel treatment, finish, balance, and durability. Training swords often use thicker construction and a rougher finish to withstand frequent pell work at a lower cost.
Yes, but regular training can shorten the life of your tournament weapon. Pell work and repeated drills create dents, scratches, edge deformation, and stress around the guard and pommel. A dedicated training sword lets you preserve your competition blade for events. You can still use a tournament sword for light technical practice when you need to reproduce its exact handling.
Two-Handed Swords
Type 2 swords may have a handle between 20 and 50 cm. Type 3 swords allow a handle between 30 and 50 cm. The ideal length depends on your gauntlets, hand size, and technique.
The grip should accommodate both gauntleted hands without crowding them against the guard or pommel. It should also allow small hand-position adjustments. Test the sword with your actual combat gauntlets because padded hand armor changes grip diameter, spacing, and wrist movement.
No. Buhurt rules prohibit thrusts and weapons designed solely for stabbing. Fighters may only deliver permitted cutting strikes with the approved striking areas. The blade must have blunt edges and a rounded point.
Both striking and non-striking edges need at least 2 mm of thickness. Every edge also needs a radius greater than 10 mm. Tournament officials must inspect the sword before use.
A Type 3 bladed weapon should weigh between 2.3 and 3 kg. Current requirements allow an upward measurement tolerance of 100 g. Type 3 swords must also measure 120 to 160 cm overall, with a blade length of 90 to 130 cm.
Some smaller two-handed swords qualify as Type 2 weapons instead. These swords must weigh between 1.7 and 2.3 kg. Always classify the weapon by its actual specifications rather than its product name.
Type 2 longswords belong to the longsword duel category. Fighters may also use qualifying Type 2 and Type 3 bladed weapons in buhurt group battles, including 5v5 and larger melee formats. Outrance or profight may permit two-handed swords that meet the relevant measurements and balance requirements.
A large sword sold as a greatsword does not automatically qualify for every category. Officials determine its class from its weight, length, construction, and historical design.
Under armor padding
Leather likes respect – not drama.
- Keep it dry. If it gets wet, let it air-dry naturally (no heaters, no sun baking).
- Condition lightly with leather balm or oil every few months to prevent cracking.
- Avoid soaking or harsh chemicals — they weaken the fibers.
- If dirt builds up, wipe with a damp cloth, nothing aggressive.
- Store your gear in a cool, ventilated place, not in a sealed bag.
Healthy leather lasts longer, bends better, and stays battle-ready.
Avoid machine washing. It twists the layers and ruins the stitching.
The safest method: fill a bath with warm water, add mild detergent, and let your padding soak.
Rinse gently — no wringing or twisting.
Dry flat on a towel or rack. This keeps the shape and padding thickness intact.
Make sure it’s completely dry before storing or wearing again.
We understand the importance of a well-fitting padded set for both comfort and protection in buhurt. Here is the guide on how to take your measurements for your gambezone and padded chausses (or pants).
Here’s a guide for the measurements for the under-armor padded set:
Body:
- B (Height): Stand tall and measure your height in centimeters (cm) without shoes.
- F (Chest Circumference): Wrap the tape around your chest at its fullest point, keeping it parallel to the ground. Breathe normally, don’t inflate your chest!
- G (Waist Circumference): Find your natural waist and measure its circumference. Avoid tightening excessively.
- H (Hips Circumference): Measure around your hips at their widest point, level with your buttocks.
- Weight: Weigh yourself in kilograms (kg) for accurate size charts.
Arms:
- S (Sleeve Length): With your arm relaxed, measure from your shoulder joint to your wrist bone, slightly bending your elbow.
Legs:
- Y (Leg Length): Stand straight and measure from your belt line down to the floor.
- AB (Groin to Floor): For extra protection, measure from your groin area down to the floor while squatting slightly.
- I (Thigh Circumference): Find the widest part of your thigh and measure its circumference.
- J (Thigh Above Knee): Measure around your thigh just above the knee.
- K (Calf Circumference): Wrap the tape around the widest part of your calf.
- L (Ankle Circumference): Measure your ankle circumference, ensuring a snug but comfortable fit.
Preferred Length:
- Gambezone Length: Decide your desired length and measure from the base of your neck down your front to that point.
Additional Tips:
- If unsure about any measurement, err on the slightly bigger side for adjustments later.
- Use a flexible measuring tape and stand on a level surface.
- Double-check your measurements for accuracy.
Remember: Proper measurements for the under-armor padded set ensure a perfect fit, maximizing your comfort and protection in the heat of battle. Conquer the measuring tape and dominate the battlefield!