Armor kit
Our armor kits take the guesswork out of gearing up. Each set is carefully curated with matching pieces that work seamlessly together, following best practices in the sport.


Armor kit FAQ
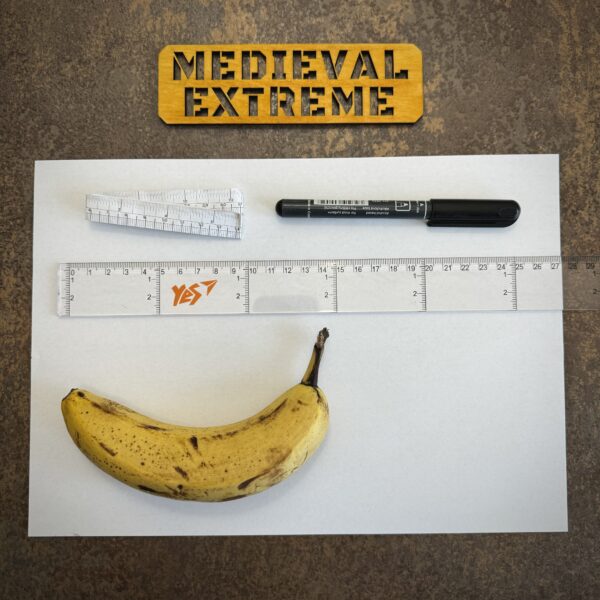
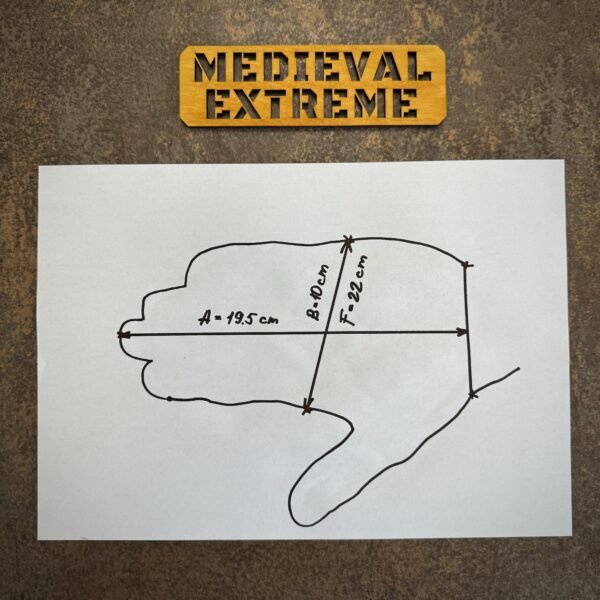
A, B and F – are measurements for the gauntlets required to make them or find out the right size.
Gather your tools:
- Paper
- Pen
- Flexible measuring tape
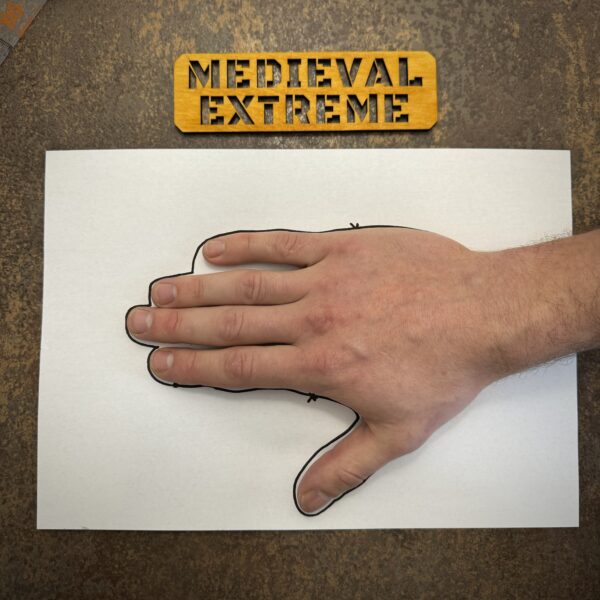
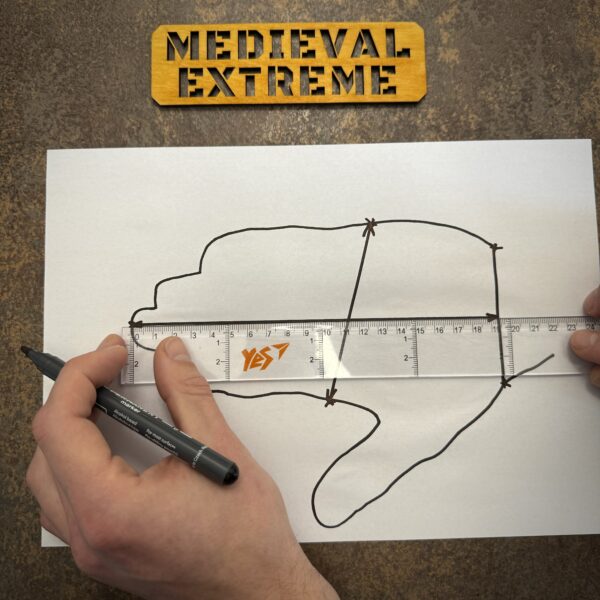
Step 1: Trace your handprint:
Lay your hand flat, fingers relaxed. Carefully outline your entire hand, including fingertips and wrist.
Step 2: Palm length:
Grab the measuring tape and measure the straight line from your middle finger’s tip to your palm’s base at the wrist. This is your palm length (A).
Step 3: Knuckle width:
Using the outline you drew on the paper in step 1, measure the straight-line distance across the knuckles (B).
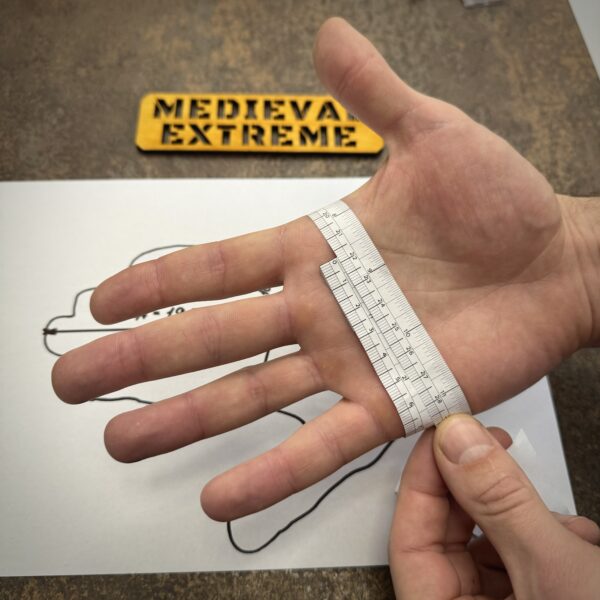
Step 4: Palm circumference:
Keep your fingers relaxed and together. Wrap the tape snugly around your knuckles This is your palm circumference (F).
Pro tips for perfect sizing:
- Dominant hand: If one hand is larger, mark it for specific size checks.
- Size up: When between sizes, opt for slightly larger measurements for the gauntlets
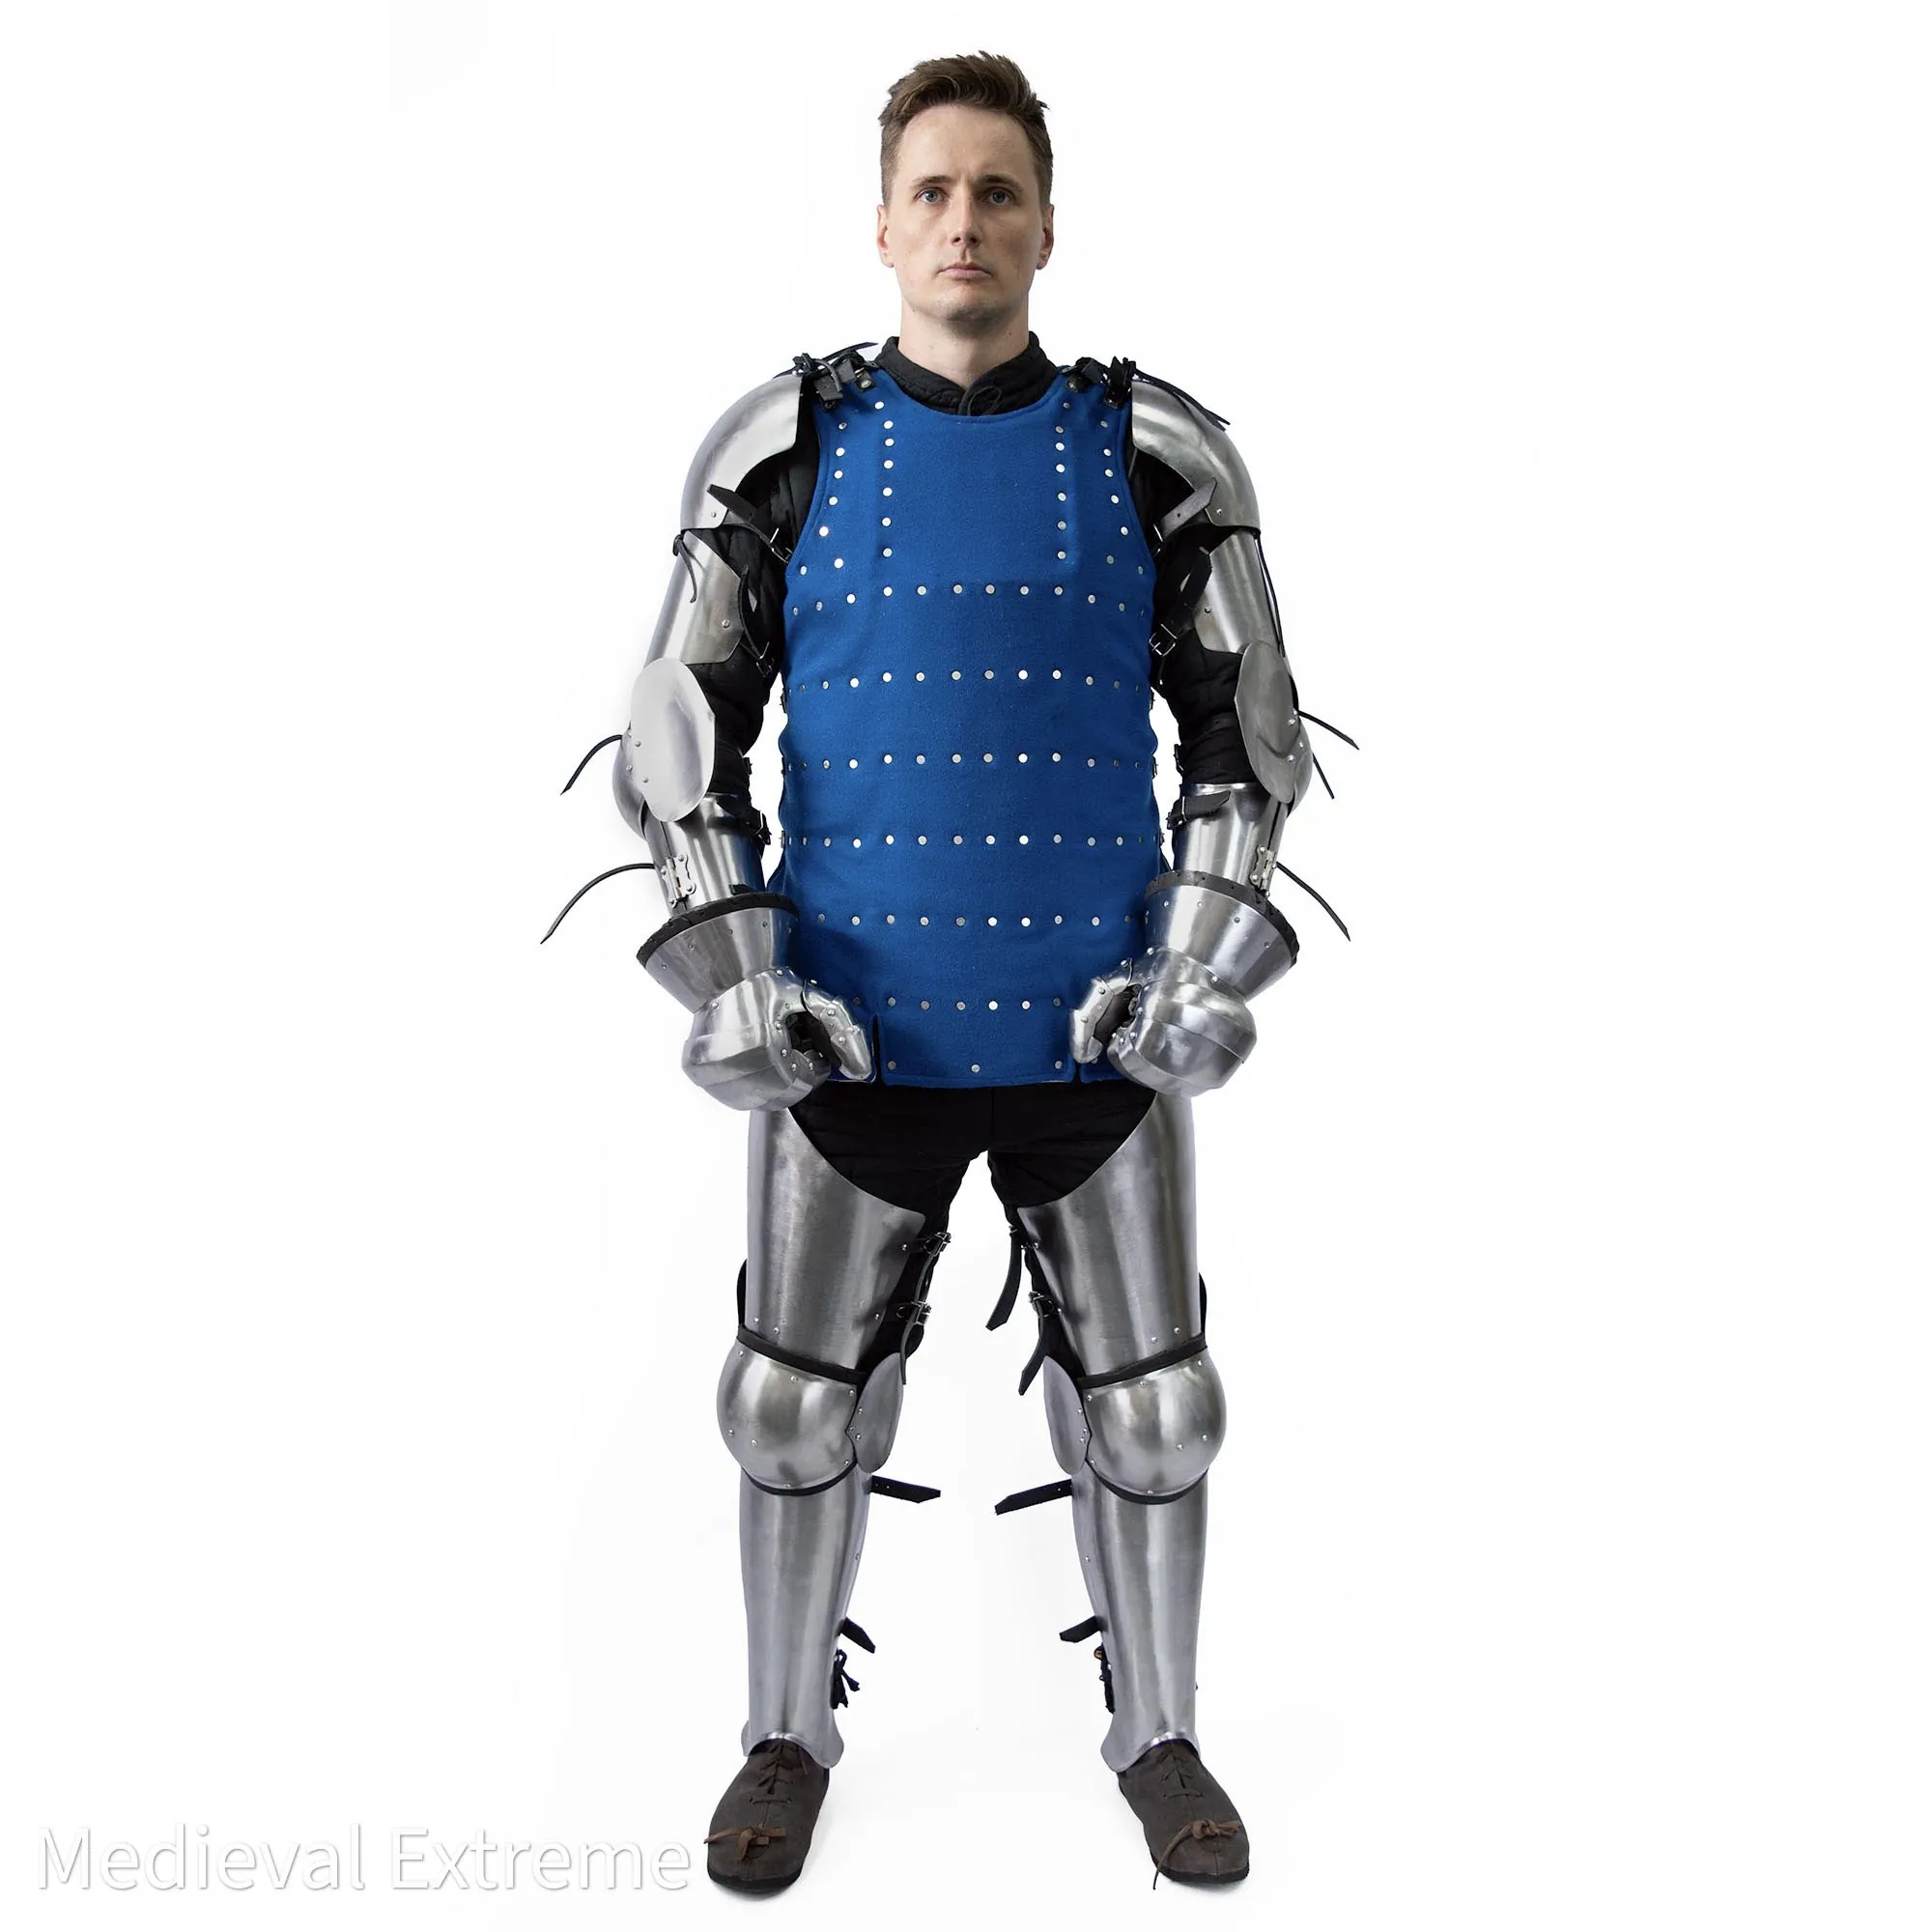
We understand the importance of a well-fitting padded set for both comfort and protection in buhurt. Here is the guide on how to take your measurements for your gambezone and padded chausses (or pants).
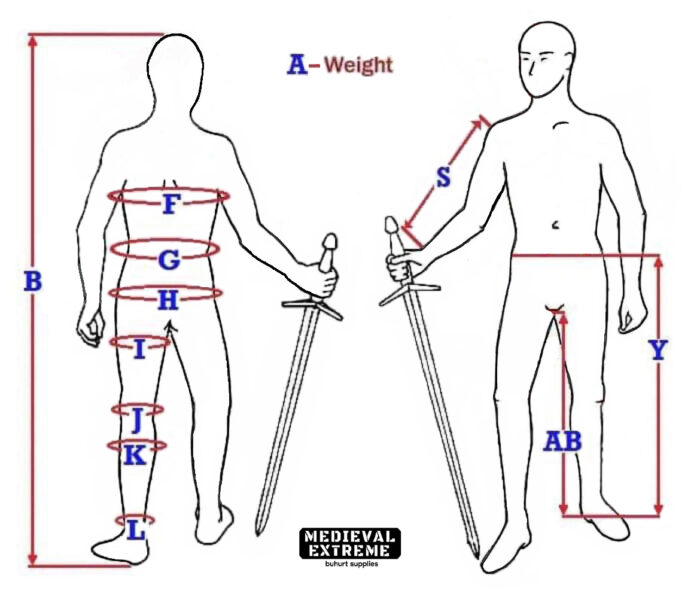
Here’s a guide for the measurements for the under-armor padded set:
Body:
- B (Height): Stand tall and measure your height in centimeters (cm) without shoes.
- F (Chest Circumference): Wrap the tape around your chest at its fullest point, keeping it parallel to the ground. Breathe normally, don’t inflate your chest!
- G (Waist Circumference): Find your natural waist and measure its circumference. Avoid tightening excessively.
- H (Hips Circumference): Measure around your hips at their widest point, level with your buttocks.
- Weight: Weigh yourself in kilograms (kg) for accurate size charts.
Arms:
- S (Sleeve Length): With your arm relaxed, measure from your shoulder joint to your wrist bone, slightly bending your elbow.
Legs:
- Y (Leg Length): Stand straight and measure from your belt line down to the floor.
- AB (Groin to Floor): For extra protection, measure from your groin area down to the floor while squatting slightly.
- I (Thigh Circumference): Find the widest part of your thigh and measure its circumference.
- J (Thigh Above Knee): Measure around your thigh just above the knee.
- K (Calf Circumference): Wrap the tape around the widest part of your calf.
- L (Ankle Circumference): Measure your ankle circumference, ensuring a snug but comfortable fit.
Preferred Length:
- Gambezone Length: Decide your desired length and measure from the base of your neck down your front to that point.
Additional Tips:
- If unsure about any measurement, err on the slightly bigger side for adjustments later.
- Use a flexible measuring tape and stand on a level surface.
- Double-check your measurements for accuracy.
Remember: Proper measurements for the under-armor padded set ensure a perfect fit, maximizing your comfort and protection in the heat of battle. Conquer the measuring tape and dominate the battlefield!
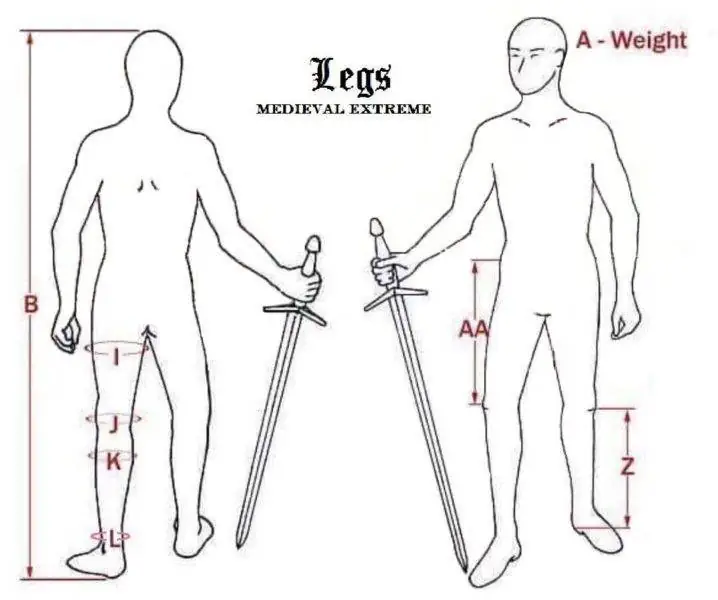
General Recommendations for Measurements for Legs Armor:
Clothing: Measurements should be taken wearing the padded chausses you intend to wear with the armor. Sweatpants or jeans will not accurately reflect the thickness of the padded chausses and could lead to ill-fitting armor.
Bare Legs If you are ordering both legs and padding together, measuring your bare legs is acceptable. However, please clearly indicate on the measurement sheet that the measurements are for bare legs.
Measurements: Take all measurements with a flexible measuring tape, snug but not tight.
Additional Notes:
- Take all measurements with padded chausses or similar under-the-legs armor and shoes on.
- Ensure you or the person being measured is standing straight and relaxed with feet shoulder-width apart.
- Use a flexible measuring tape for accurate circumference measurements.
- Consider additional measurements if specific armor requires them (e.g., knee joint width, foot length).
- This table provides a basic guide and adjustments might be necessary based on individual body shape and specific armor design.
Required measurements:
A. Weight: Measure your weight in kilograms or pounds without wearing any armor.
B. Height: Stand tall and measure the distance from the top of your head to the soles of your feet.
I. Maximal thigh circumference: Find the widest part of your thigh, usually just above mid-thigh. Wrap the tape measure snugly but not tight.
J. Thigh circumference above knee: Measure the circumference about 10 cm above your kneecap with the tape snug but not tight.
K. Calves: Measure the widest point around your calf muscle with the tape snug but not tight.
L. Ankle: Measure the narrowest part of your ankle just above the ankle bone with the tape snug but not tight.
AA. Hip to Knee: Stand with your leg relaxed. Locate the bony bump on the side of your hip bone (greater trochanter) and the center of your kneecap. Measure the distance between these points while keeping your leg straight.
Z. Knee to Ankle: Stand with your leg relaxed. Locate the center of your kneecap and the highest point of your ankle bone. Measure the distance between these points while keeping your leg straight.
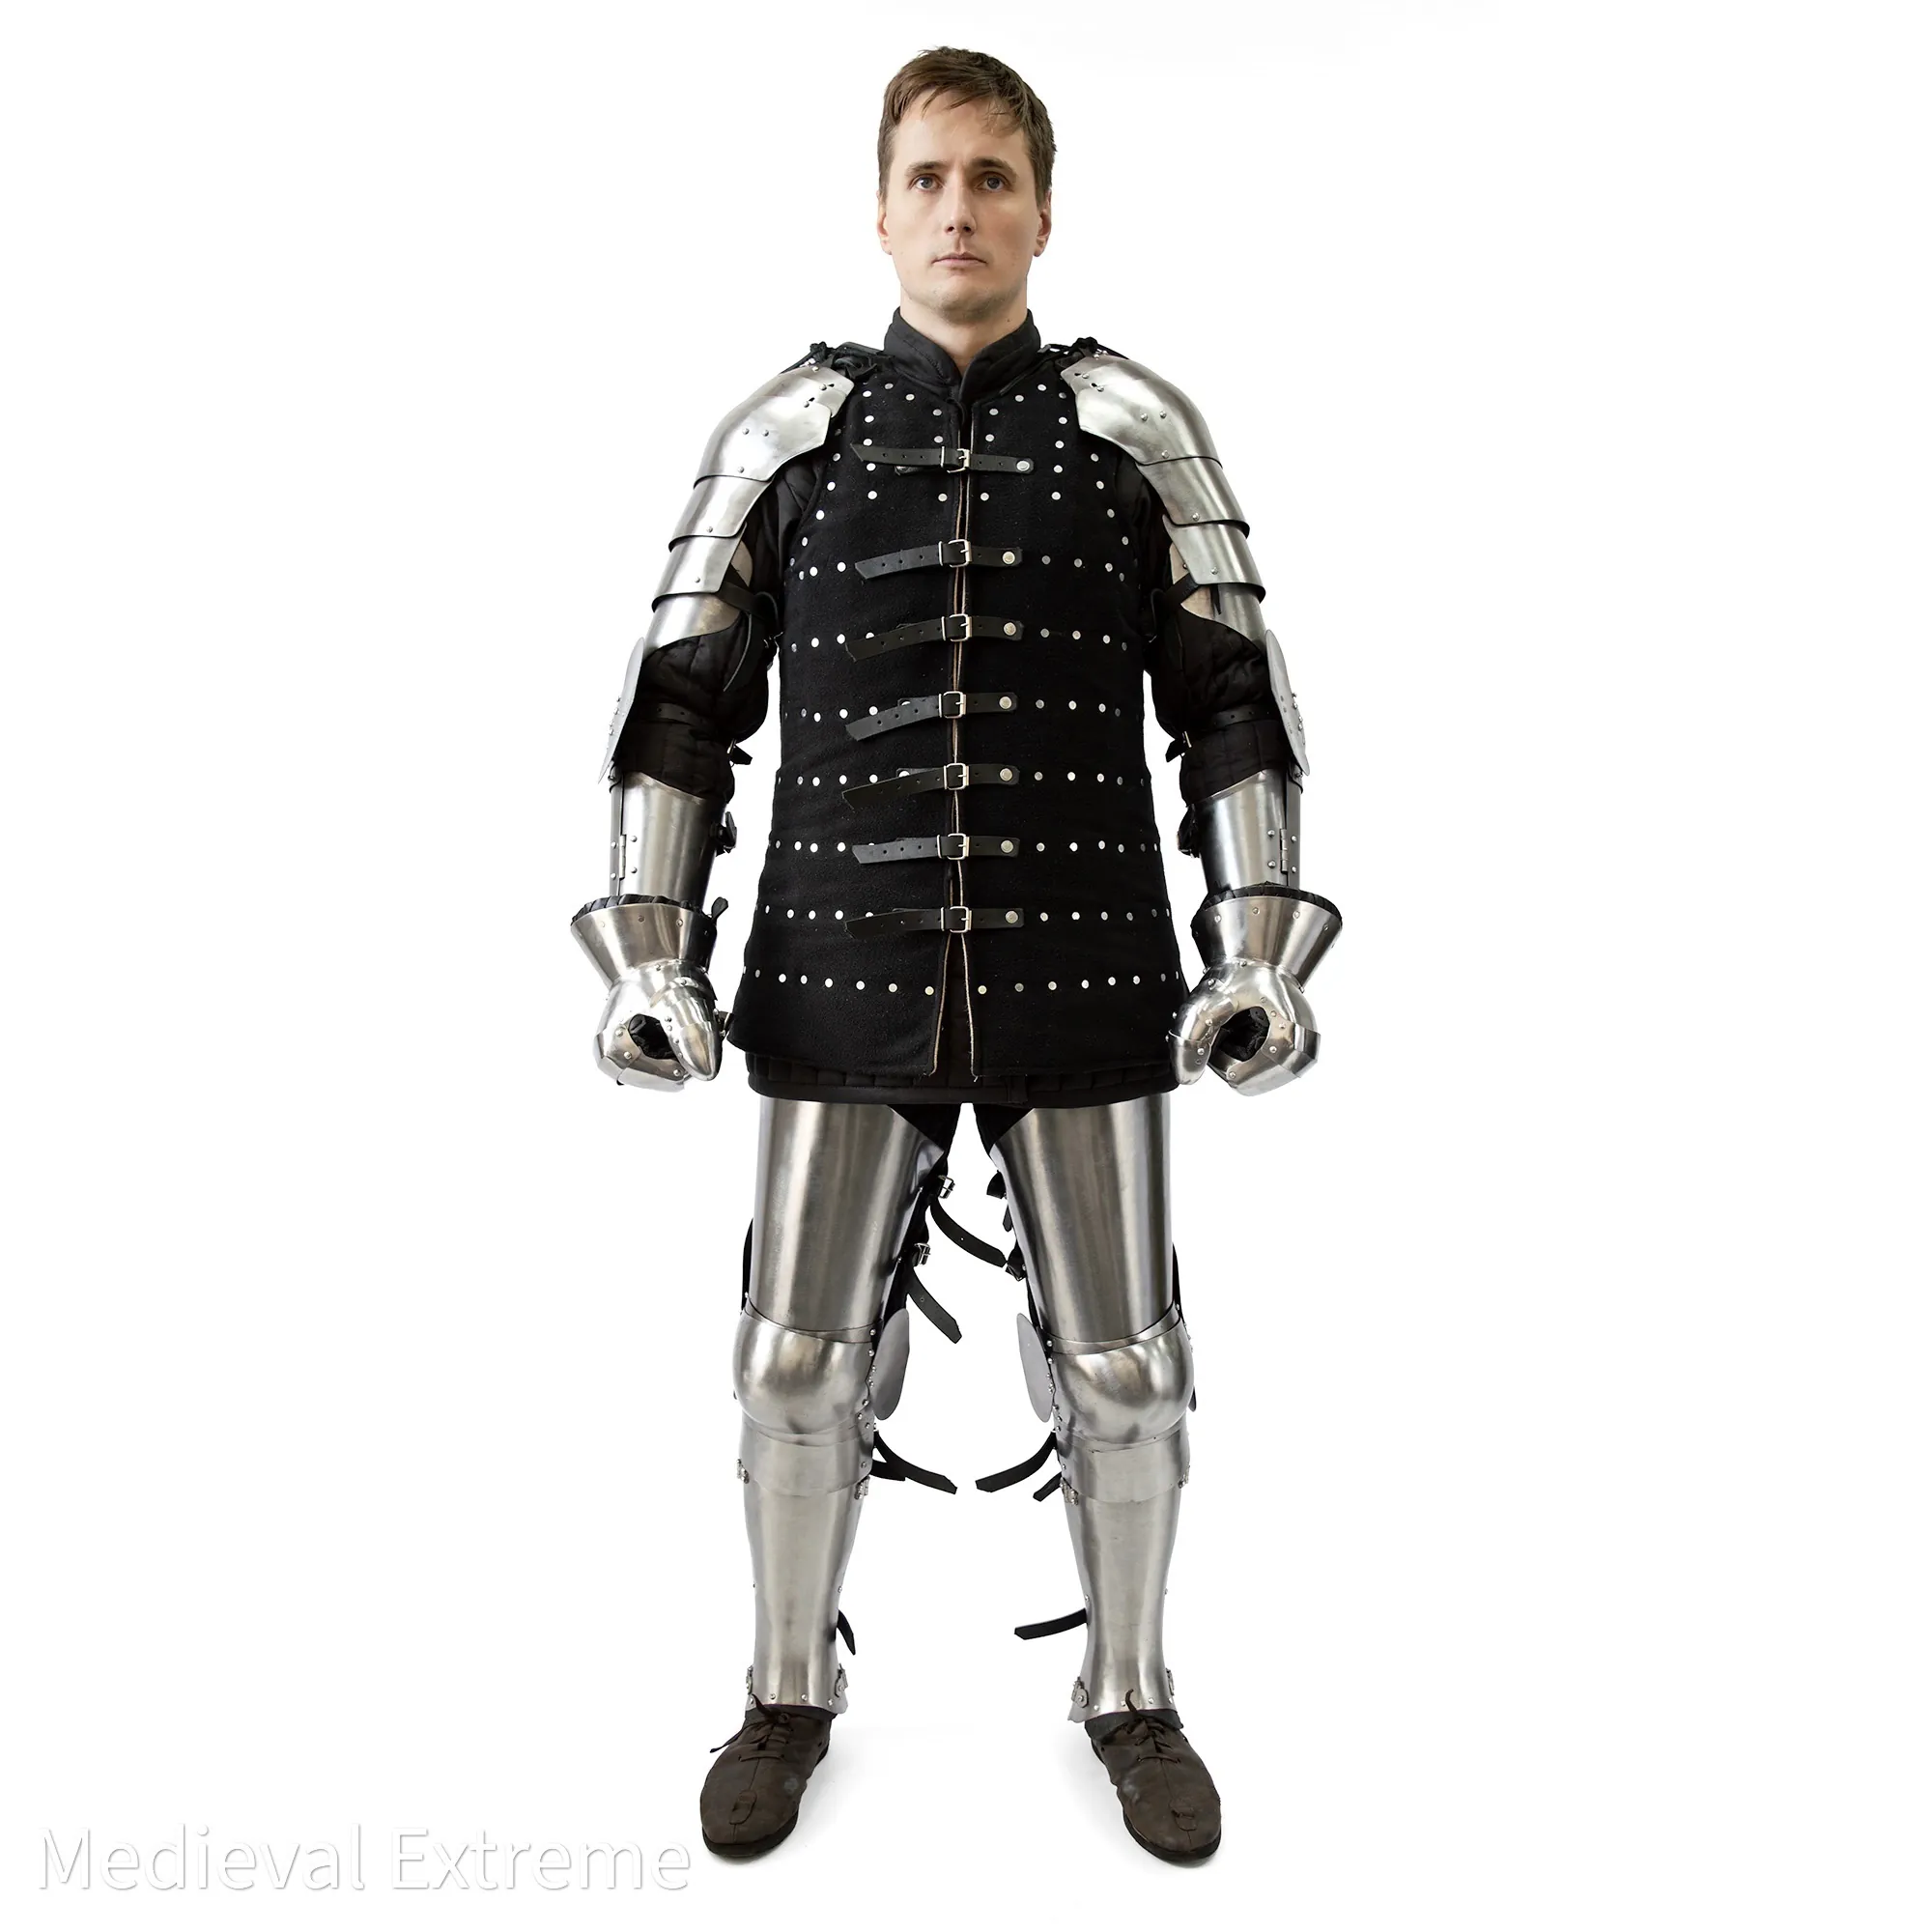
Before we begin, ensure you have your actual padded under-armor kit ready: gambeson, chausses, and c-belt. Using anything else like modern jackets, sweatpants, or layered sweaters won’t provide the accurate measurements needed for fitting your brigantine. If you’re planning to order both your padded kit and brigantine from our shop simultaneously, sending your bare body measurements is acceptable. However, please inform us of this so we can properly adjust the sizing based on your true dimensions.
Additional Tips:
- When taking measurements, stand relaxed with good posture.
- Make sure the measuring tape is snug but not tight.
- If you’re unsure about any measurements, it’s always best to err on the side of being slightly larger.
- Consider having someone else take your measurements for greater accuracy.
This table should give you a good starting point for taking all the necessary measurements for your medieval body armor. Remember, precise measurements are crucial for a comfortable and well-fitting suit of armor.
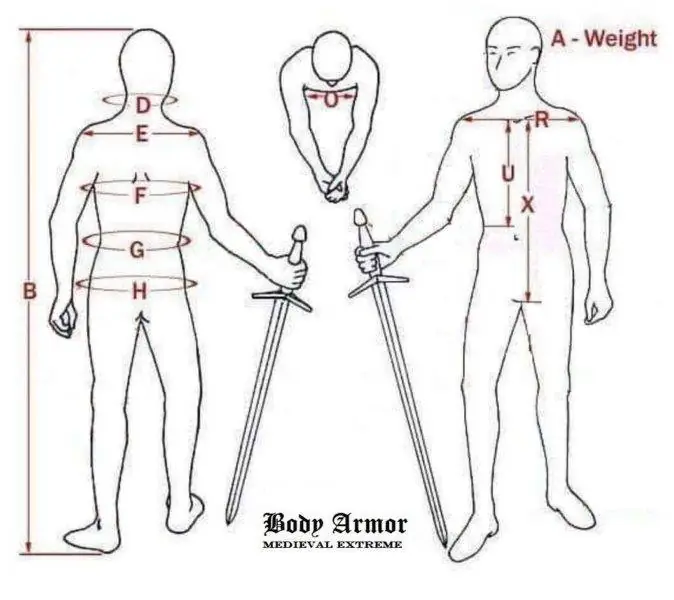
Required measurements:
A. Body Weight: Stand on a scale without shoes or other heavy clothing.
B. Full Body Height: Stand straight, barefoot, with your back against a wall. Have someone measure from the top of your head to the floor.
D. Neck Circumference: Measure around the base of the neck, just above the collarbone.
E. Shoulder Width (Back): Measure from the seam of one shoulder pad to the seam of the other, across the back.
R. Shoulder Width (Front): Measure from the seam of one shoulder pad to the seam of the other, across the chest.
O. Chest Width (Arms Together): Measure the front of the chest with arms holding each other, from armpit to armpit.
F. Maximum Chest Circumference: Measure around the chest at its fullest point, usually while breathing in.
G. Waist Circumference: Measure around the narrowest part of your waist, above the hips.
H. Maximum Hip Circumference: Measure around the widest part of your hips, usually at the level of your buttocks.
U. Neckline to Waistline: Measure from the lowest point of the neckline just under the neck to the waistline, usually above the belly button.
X. Neckline to Groin Line: Measure from the lowest point of the neckline just under the neck to the groin line, where you want the armor to end. This helps ensure the pelvis is covered.
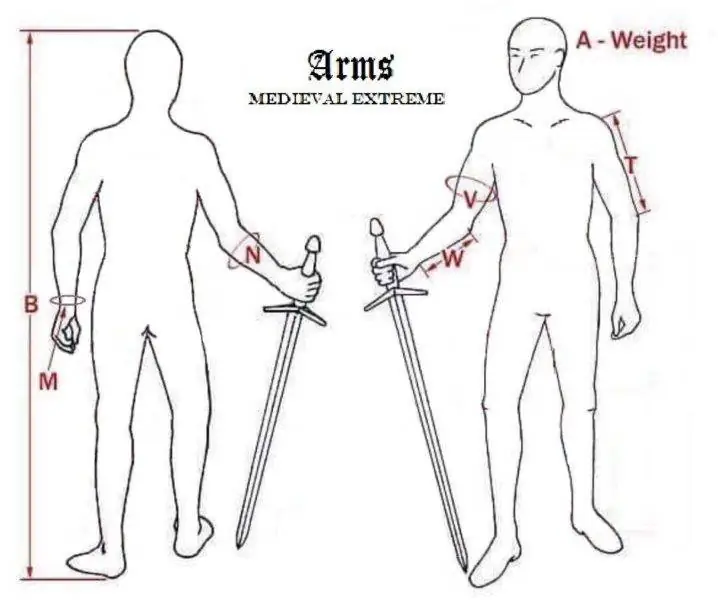
General Recommendations for Measurements for Arms Armor:
Clothing: Measurements should be taken wearing the gambeson you intend to wear with the armor. Sweaters or jackets will not accurately reflect the thickness of the gambeson and could lead to ill-fitting armor.
Bare Arms: If you are ordering both arms and padding together, measuring your bare arms is acceptable. However, please clearly indicate on the measurement sheet that the measurements are for bare arms.
Measurements: Take all measurements with a flexible measuring tape, snug but not tight.
Additional Notes:
- If your gambeson has any unusual features that might affect the fit of the armor, please describe them in the notes section.
- For best results, have someone else take your measurements.
- Feel free to include any other measurements you think might be helpful, such as elbow circumference.
Required measurements:
A. Weight: Measure your weight in kilograms or pounds.
B. Height: Measure your full height from head to toe.
M. Wrist Circumference: Measure above the gambeson, not on top of any leather straps.
N. Forearm Circumference: Measure the fullest part of the forearm.
V. Bicep Circumference: Measure the fullest part of the bicep, slightly flexed.
W. Forearm Length: Measure from the wrist joint to the tip of the elbow.
T. Shoulder Length: Measure from the point where the shoulder meets the neck to the tip of the elbow.
To ensure the helmet for armored combat fits correctly, take your measurements without any padding, using a tailor’s measuring tape.
Refer to the diagram:
- A – Maximum head circumference measured horizontally around the widest part of the head (typically from the forehead across the back of the skull).
- B – Vertical distance from the center of the eye level straight down to the top of the shoulder. This helps us determine the appropriate helmet length to ensure full coverage without restriction.
For the best fit, please double-check your measurements and include them in centimeters.
If there are any specific considerations — such as plans to wear additional padding, a request for reinforced vision protection (e.g., extra eye bars), or anything else that might influence the build — please mention this in the order comments during checkout. We take these details into account during production to ensure your helmet arrives ready and optimized for use.

Yes. If you order our padded kit, we can adjust your bare-body measurements and make both the under-armor padding and the steel parts together.
We use our own measurement charts and know exactly how much allowance to add for the padding thickness.
For other brands’ padded kits, we can’t guarantee the fit — every manufacturer uses different thicknesses and patterns, so we can’t calculate the correct allowances.
Complete Guide to a Medieval Armour Kit: The Ultimate Buhurt Armor Full Set for Knights
When it comes to competing in buhurt, having the right armor isn’t just about authenticity; it’s about your safety and proper carrying out on an arena. These complete buhurt armor sets represent a comprehensive assemblage of gear parts for protection that transforms an athlete into a valorous knight. The fit must be precise—too loose and you risk dangerous gaps in protection; too tight, and your mobility suffers. So, are you ready for intense full-contact combat?
What is a Medieval Armor Kit and Why Do You Need One?
A buhurt armor full set is designed for buhurt as a complete set of protective gear that covers a knight’s full body. Compared with ceremonial or decorative armor, these buhurt armour sets are constructed to withstand the intense damage in dynamic combat but maintain historical accuracy. If you would like to attend a buhurt competition, your full armor suit is required to meet necessary safety measures. It must also ensure that you can move freely and rapidly for an advantage in intense competitive matches.
Exploring the Components of a Buhurt Armor Full Set
Any full plate armor is made of multiple parts but starts with a helmet that features toughened construction and certain padding to prevent damage of heavy strikes. The torso protection includes a sturdy breastplate, backplate, and faulds, all working together to shield your body parts but not reduce mobility. A full knight armor is protected by pauldrons, rerebraces, couters, and vambraces, and legs are covered with cuisses, poleyns, and greaves.
Under the full set of armor, knights usually wear a gambeson, a padded jacket that provides crucial additional protection; it’s made of multiple layers of fabric (leather or wool) that were sewn together to shape thick, safeguarding layers. On the other hand, gauntlets protect the hands and allow for better weapon control, and sabatons guard the feet during the course of repeated footwork.
How to Choose the Right Buhurt Armor Kit
Deciding on the perfect buhurt armour kit requires rigorous consideration of multiple factors—ensure that all parts meet your league’s safety standards and historical accuracy. Weight distribution is crucial since a well-balanced full medieval armor typically weighs 25–35 kg and must grant proper movement and endurance during matches.
Consider your fighting style when choosing armor kit thickness and articulation points. More aggressive knights might opt for heavier protection, while those focusing on agility might choose lighter options where rules permit.
Quality is paramount in buhurt armor, so look for a full set of knight armor made from proper hardened steel with thick enough plates to withstand direct hits. Pay special attention to joint articulation and strap quality, as these are common failure points. A proper full suit of knight armor should include all necessary padding and attachment systems and ensure comfortable wear.